Sunday, March 25, 2018

So Happy


Hey Everyone!
We are halfway through the current Inky Paws Challenge

 It's all about the color!


With Easter right around the corner, I came up with this cute little project
 that you can use as a decoration or maybe even place card for the holiday.

So Happy a card by Diane Morales | Bitty Bunnies Stamp Set by Newtons Nook Designs

This looks complicated but it's not.
I have one bunny from the Bitty Bunny Stamp Set
Die cut grass and background from the Land Borders Die Set
And eggs from the Beautiful Spring Die Set
Using an oval die from my die stash.
 I cut out the background and stamped on the sentiment.
Then I just added on layer-by-layer using foam tape between the
 layers to give it to give the project dimensions.

There is no right or wrong, it is how you want to create your layers.
I added some bling on the eggs with Stickles
And finished up with Glossy Accents here and there.

Now it is your turn, use the Link in the challenge picture above
to show us how you get your PAWS INKY.


As always links to the stamps and dies are below.
Thanks so much for dropping by
See you at the next Inky Paws Challenge.


Diane


Sunday, March 18, 2018

Sending Hugs with Baskets IPC 68


Hello Everybody!
 Welcome to a NEW Inky Paws Challenge.
This time around we have a color challenge for you.


I don't know about you guys but this time changes got me all messed up.
The upside to this is that spring has sprung.
 All the flowers in my yard are starting to bloom and there is color everywhere!
With Easter around the corner I thought I would take the opportunity
 to dig deep into my bag of crafty trick and do something a little different.
Using the challenge colors, I came up with these cute mini Easter baskets.

Sending Hugs with Baskets| A project by Diane Morales | Sending Hugs Stamp Set by Newtons Nook Designs

The idea for these baskets came sometime ago when I when I taught a class on
 how to use your Score-pal. You guys remember that tool, most people still have one.
This is surprisingly simple, and here it is.
Start with a 6-inch round circle.


How you create that circle is up to you if you want to use your Silhouette, cricket, 
or just your dig into the stash and grab that Circle cutter. 
The important thing to remember is it must be 6-inch round, or your final basket will be lopsided.
Once your circle is cut, take out your favorite scoreboard of your choice and you’re going to score at the 2-inch line and the 4-inch line. Turn to the right and score at the 2-inch line and the 4-inch line again.
Next, score all those round corners from the center Square out.


Finally, fold all those corners and then an attached those on the inside with your favorite heavy glue.
The handle of the basket is simply a 1-inch strip of paper that is glued to the inside.


 To decorate my baskets, I grabbed my Sending Hugs Stamp Set, 
and use elements from the stamp set to make each basket individual and unique.
I had a great time picking and choosing which one of my
 favorite Newton aniamal was going to go with what basket color.


The “Happy Easter” sentiment is from the Hello Spring Stamp Set
I know what you're thinking, there’s a die somewhere from a company that does this? This is true.
Sometimes, I like to just create things from scratch. I LOVE all the crafty tools that I have in my arsenal, and I LOVE to pull them out and used them whenever I can.
This is such an easy project that even little hands can help you with it.
Also, is a great classroom project for you teachers out there.
That is my inspiration for today. I hope that this inspires you to grab your favorite
Newton Nook Stamp Set, your favorite tool from your stash and create something.
Don’t forget to show us what you create using the link above in the challenge picture.
As always, links to the stamp sets and dies are below.
Thank you so much for stopping by.
See you at the halfway point.
Diane


Thursday, March 15, 2018

Beam Me UP !


Hello Everyone
Today I have a card for the current
  Lawn Fawnatics Challenge


Did someone say die cutting!  You have come to the right place.
I was fortunate enough to attend an event at the Lawn Fawn Headquarters.
 YES! it is a very magical place.
When I was there, I was surrounded by some incredibly talented people and tons of inspiration.
I knew about the current challenge, and when I saw the
 the Beam Me Up Stamp Set this idea for a card popped into my head.
Beam Me UP! a card by Diane Morales | Beam Me Up Stamp Set by Lawn Fawn

I LOVE texture and color.
When I make a card, I want people to pick it up hold it and check out all the details.
This card has plenty of those.
Starting with the background. The background was made with a combination of Ranger Texture Paste and Picket Fence Distress Paint that was mixed together and splashed on black cardstock.


Caution…this technique is real cool, but it does take some time to dry.
 Make sure you budget that in to your project time
When it you touched it has a raised texture feeling.
To the top of this I added my cute aliens and spaceships
 from the Beam Me Up Stamp Set.
Having the dies for this set are essential because you
 get a nice clean-cut, and you’re able to pop things up here and there.
Make the card look interesting.
On some of my aliens I added Nuvo drops (more texture)

 And …that is my card for today
I hope that your try the technique because it is a lot of fun!
Link to the stamps below.
Thanks for stopping by
Diane


Sunday, March 11, 2018

Some Bunny IPC 67


HI EVERYONE!

We are halfway through the current

Inky Paws Challenge
at
Newton’s Nook Design.


In case you didn't know we have one of my favorite challenges a SKETCH CHALLENGE
 I love sketch challenges because you can reimagine the sketch into unique cards.
For my inspiration for this challenge, I decided to just that!


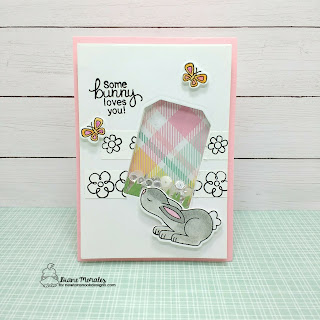
Some Bunny | a card by Diane Morales | Bitty Bunnies Stamp Set by Newton Nook Designs


Instead of putting a tag, I decided to turn the tag into 
a tag shape and make this a Shaker card.
I started by making the card top, which since I planed the Shaker part of the card
 was going to be very colorful I want with a basic white.
I stamped the flowers from the “Itty Bitty Bunny Stamp Set on to white card stock,
cut that into strips and adhered that to another white card stock.
Now, here's the scary part, using my “Tag Two Times Die Set”.
 I die cut out the tag shape from what I just created.
Needless to say, if you get this wrong you're starting all over.
 I got lucky with mine and it turned out OK.
 I turned this over and added copious amounts of foam tape to get ready for the shaker.
After looking at what I had so far, I decided it was kind of boring.
That’s when I reached for my “Land Borders Die Set” and I die cut out some grass.
I attached the grass on the inside of my shaker portion of the card.
To finish this part up, I went to my trustworthy stash and 
picked out a cute some cute spring paper.
I wanted the paper to be shown in the background, so I added only clear or opaque
embellishments to the inside of my shaker.
 I cut the spring paper to size and attached it to the back of the shaker.


Gave it a good shake, to make sure I had no sequined leaks, and I was on the front of the card.
 I Stamp Out the Bunny and butterflies from the “Itty Bitty Bunny Stamp Set” .
 I colored my images and die cut them out and attach them to the front of the card.
In my quest for Shaker card greatness,
 I realized I had not stamp my sentiment on the front of the card.
I very carefully stamped my sentiment on the front of the card. 
(Holding my breath, the whole time)
With that mistake out of the way, I attached that card front onto a card base.
And the card was done!
NOW it is your turn do you show us what you can create.
Use the link in the challenge picture above to show us how you get your PAWS INKY.
Thanks so much for taking some time and stopping by.
Links to the stamps and dies below
Have an amazing week
DIANE


Monday, March 5, 2018

Hello Spring! IPC 67


Hello and welcome to a new Inky Paws Challenge
This time around we have one of my favorite challenges!
 
 It's a sketch challenge!


Since we've been having some unusual bit of cold in our area.
 I waned to do something fun and playful and just bright and cheery.

Hello Spring a card by Diane Morales | Hello Spring Stamp Set by Newton's Nook Designs


The idea for this card came from organizing my 6x6 paper.
I came upon the HELLO paper, that you see in the background.
The colors on this paper gave me the idea for this card.
I started out by trimming that paper and placing it on a cardstock base.

To create the background of the card. I wanted to do something different,
 so I started going through my Newton's Nook Dies
 and I came across the Land Borders Die Set
 I chose the Wavy Hill Background and just die cut pieces of that
 die out to make the back details of the sketch.

NOTE: the color seen here changed when I staged the card


For the tag portion on the sketch
I just received the Cloud Sky Stencil. I use Versamark to ink the clouds
 onto white cardstock, heat embossed with clear embossing powder,
and then inked in with Broken China Distress Ink.
Then, I stamp out my bunny from the Hello Spring Stamp Set colored the bunny
 and flowers in and added some glossy accents to the flowers.


Finally, I assembled everything onto the card base card base.

I love the way that this card came out and it’s kind of awesome
the whole idea came from a piece of paper from my stash.

I hope this inspired you to get you PAWS INKY.
Use the link in the challenge picture above to show us what you create.
Links to the stamps and dies below.
See you at the halfway point.
Thanks for stopping by!

Diane