Monday, October 31, 2022

Inky Paw's Challenge 185 - Color Challenge


Hello Inky Paws Fans!

We are at the halfway point of this current challenge.
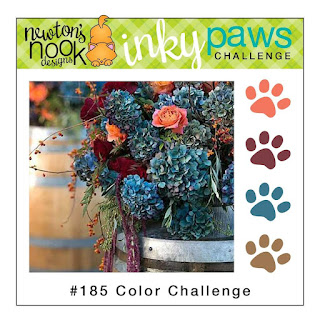
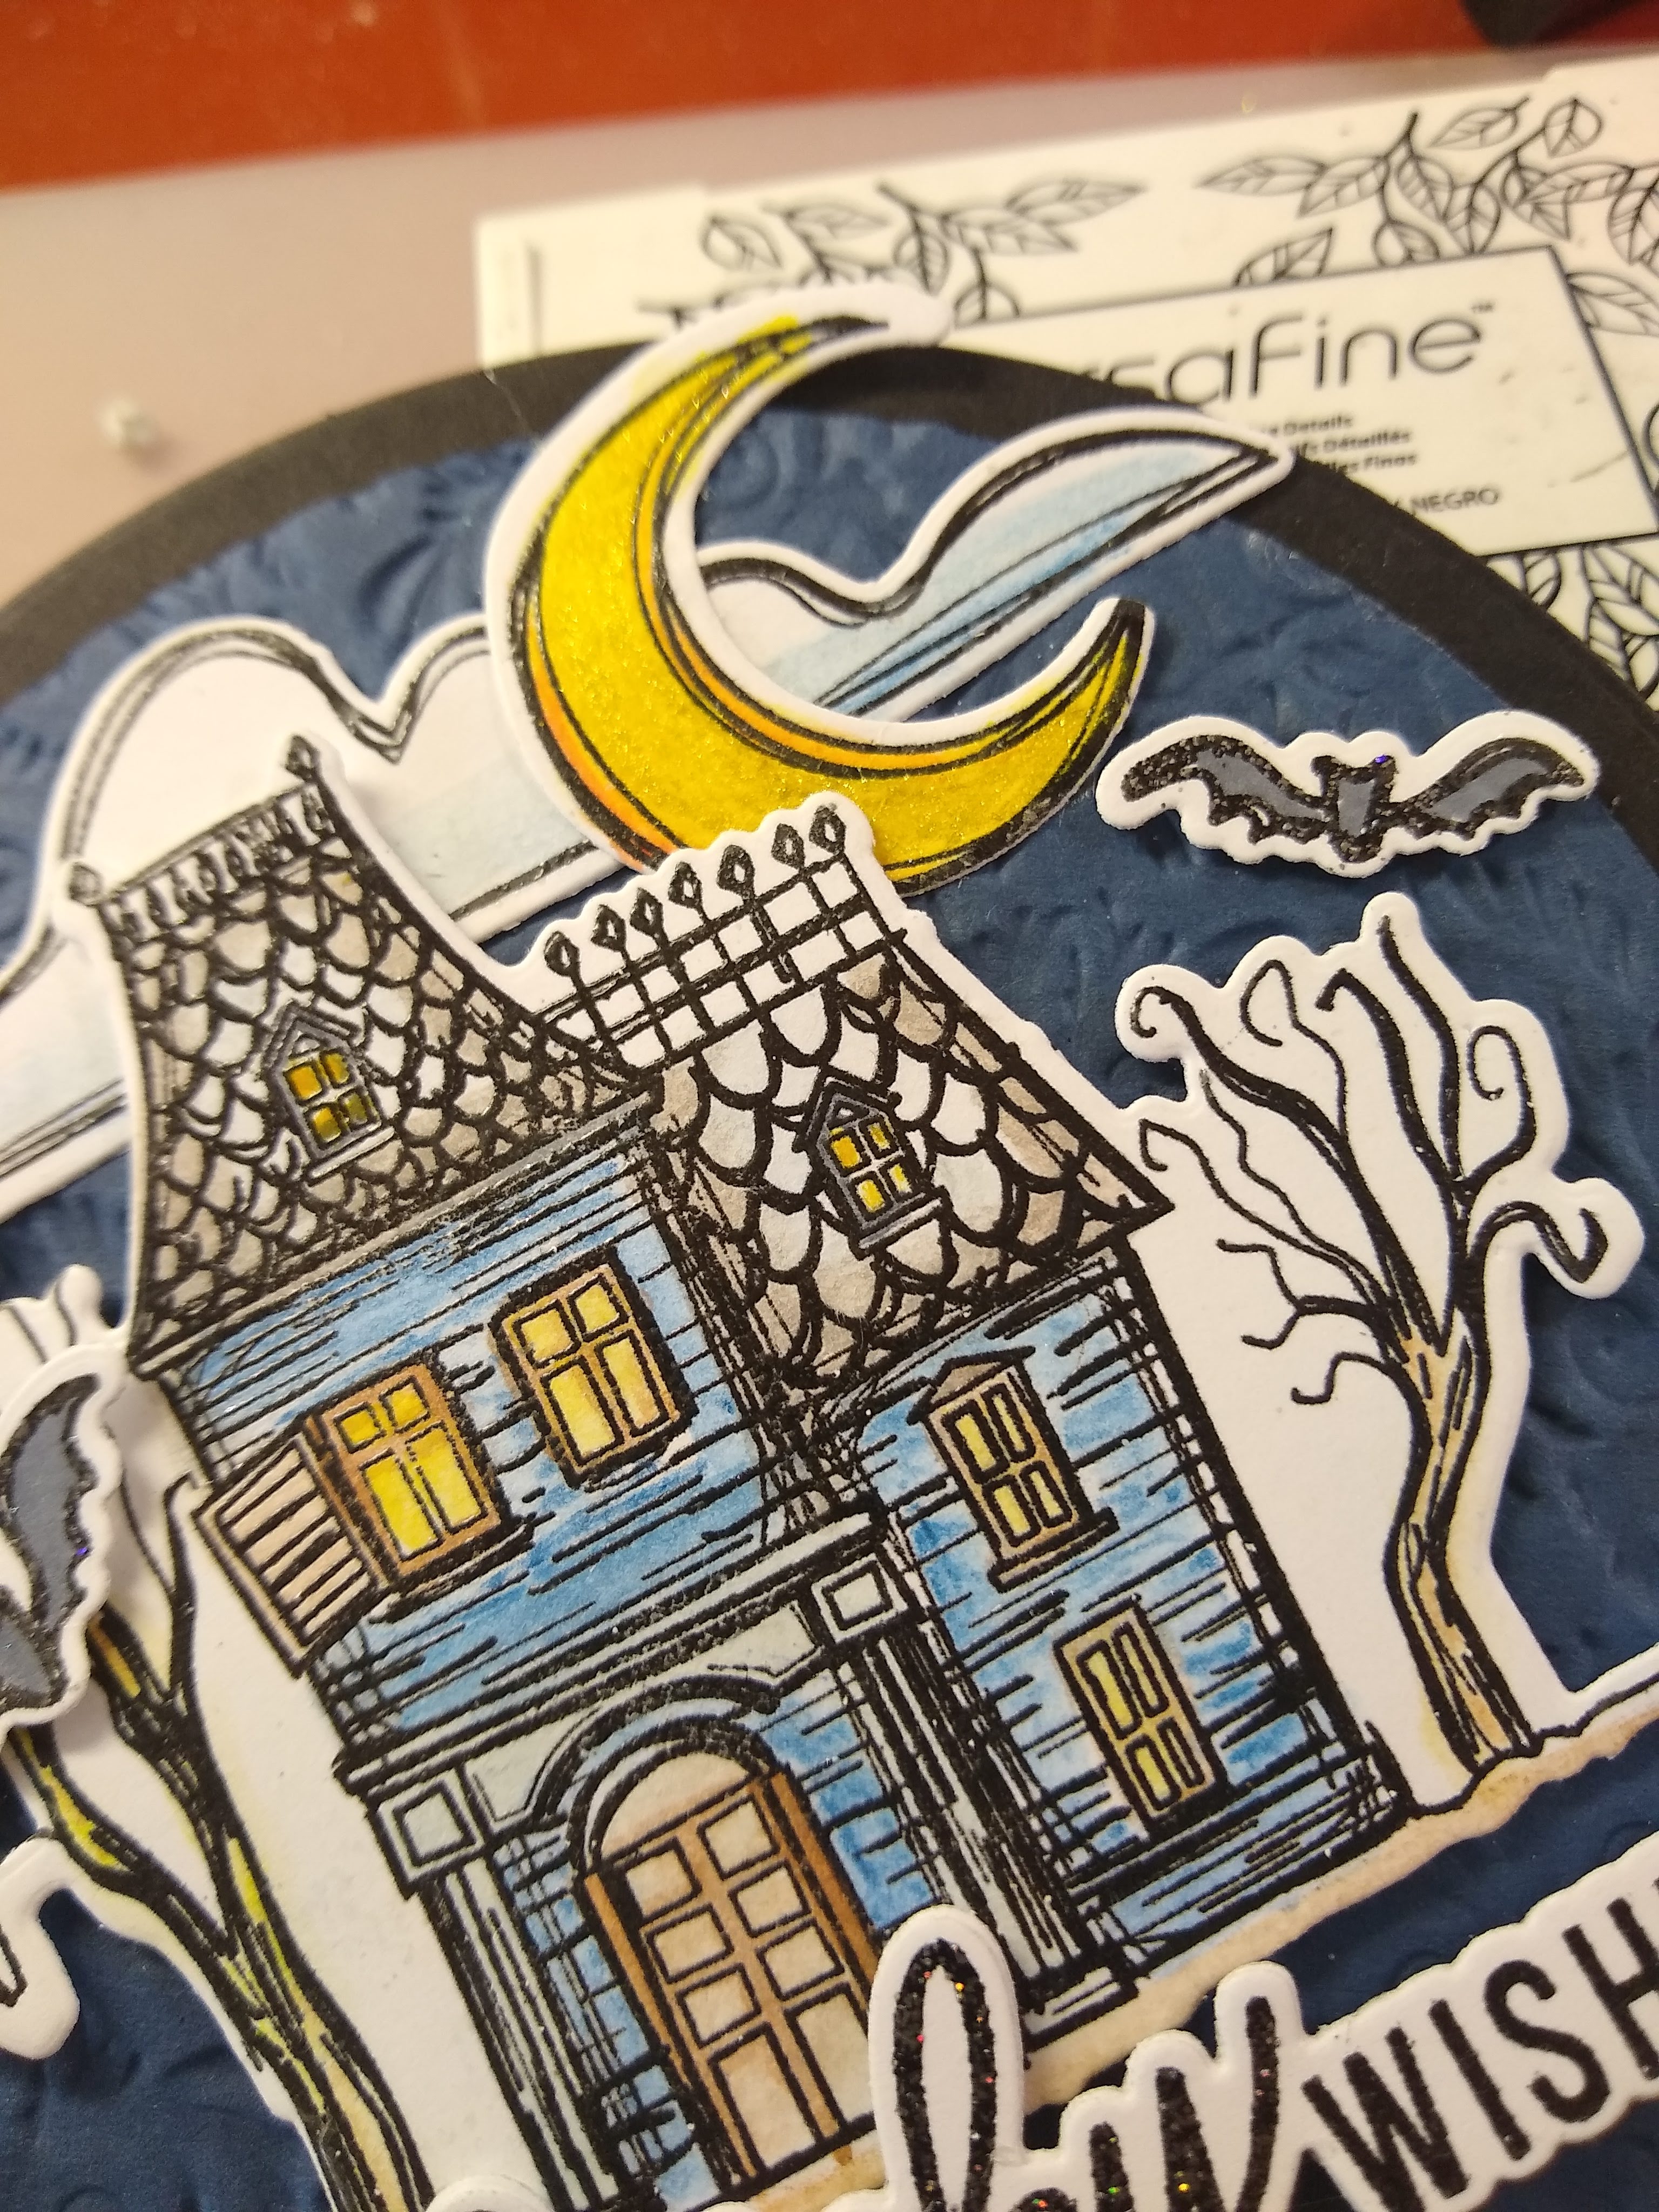
 

For this challenge I used the following Newton’s Nook Design’s product.

Holiday Heights Stamp Set

Snowflake Oval

Oval Frames Die Set

Using the Challenge Colors, I created this card.


This was such a fun card to make!

 It starts with me going into my cardstock stash and

choosing cardstock that closely matches the challenge colors.

The denim blue color, I cut down to 1 inch.

For the other colors I cut down in ½ an inch.

I dry pieced the cardstock together, figuring out the color combo that I wanted to use.


Then using a separate piece of cardstock, I glued all the strips down.

While the background was drying, I stamped out the Snowflake Oval.

Once the snowflake is die cut out using the Oval Frames Die Set,

I stared on the next part of the card.

I stamped the image from the Holiday Heights Stamp Set.

I colored in the image and for an extra twist, I colored the scarf to match the background.

I also created a banner and sentiment using leftover wine cardstock.

Now to assemble the card.

I cut down the striped card front to 4½ x 5 ½ and glued this to a card base.

Using the snowflake that come in the Holiday Heights Stamp Set,

I stamped a bunch of snow on the background with Versamark Ink.


I then glued the Snowflake Oval on the card front.

I added foam tape to the back of the snowman and dog.

I placed the image and my banner on the front of the card

and moved it around until I liked the placement.

I then glued those two items to the front of the card.

I added a bit of sparkle pent to the front of my card and….

   and that completes my take on this challenge!

Now it is your turn!

Show us your take on our fun challenge

Make sure you share your projects by using the link in

the challenge picture above.

You could be


OR


to receive a $20 Store Credit to Newton's Nook Designs!

using random.org

    Are you social?

Follow me on Instagram

at 2.sistersproject

and

Newton’s Nook Designs

Also use the following hashtags

#inkypawschallenge

#newtonsnook

#newtonsnookdesign


Thanks so much for visiting.


STAY SAFE AND STAY CRAFTY.

DIANE


Tuesday, October 25, 2022

Anything Goes - Simon Says Stamp Wednesday Challenge


THIS WEEK’S THEME AT THE

Simon Says Stamp Wednesday Challenge

ANYTHING GOES

Featuring products by

PINK AND MAIN

You do not have to use the featured company to join in.

But… If you have some of their product in your stash

We would LOVE to see them used.

Here is my take on this challenge.


For this card I used the following product

BATTY FOR YOU CLEAR STAMP SET

This is a quick and easy card that even a beginning card maker could tackle.

This card starts with a card base made with Royal Purple cardstock.

Next, cut three 1-inch strips of #120 white cardstock and attach them to front of the card.

I eyeballed the spacing the best that I could, and I cut off the extra strips on the ends.

Stamping and coloring my images came next.


I do not have the matching dies, so I fussy cut out my images.

I thought about how I wanted to place everything on the card front and then

stamped on my sentiments and stars on the front of the card.

Next, I added my images popped up with foam tape.

I added a bit of bling to the stars on the card with metallic flip markers.

I also added a bit of gems.

This completes my take on ANYTHING GOES

Featuring PINK AND MAIN

I almost forgot the good news!


The lovely folks over at Simon Says Stamp are generously giving away

a FABULOUS $25 voucher to shop at the  Simon Says Stamp Store! 

All you must do is take out your crafty supplies,

 make something following this week’s prompt,

and add a link in the Inlinkz at the bottom of this post!

You can join five times so you could have five chances to win! How IMPRESSIVE is that!!

All winners are chosen randomly, so everyone has an equal chance to win!


GOOD LUCK TO EVERYONE!


Like the products I used.

I have direct links to everything below.


Thanks so much for stopping by.

Sending HUGE Hugs

Stay Safe and Stay Crafty

Diane


HERE ARE THE SUPPLIES TO CREATE THIS CARD


Batty for You Clear Stamp Set by Pink and Main

Royal Purple Card Stock by Simon Says Stamp

#120 White Card Stock by Simon Says Stamp

Villainous Potion Distress Oxide by Ranger Ink

Onyx Black Versa Fine Ink by Tsukineko

Versafine by Tsukineko

Metallic Flip Markers by Spectrum Noir

Spectrum Noir Classique Markers (color in the image)

Halloween Harvest Gems by Honey Bee


Do you use Instagram?


Check out the Simon Says Stamp Page

Follow me on Instagram

at 2.sistersproject

ALSO, please add #ssswchallenge to your challenge entry uploads so we can see them on there too.

Inky Paw's Challenge 185 - Color Challenge

Hello Inky Paws Fans!

We have a NEW challenge coming your way. 

For this challenge I used the following Newton’s Nook Design’s product.

Christmas Tree Line Stencil

A7 Frames and Banners Die

Snowflake Oval

Using the Challenge Colors, I created this card.


I got to admit that when I saw the challenge colors I was not

Quite sure how I was going to use them.

Until the Newton’s Design order came that had the

Christmas Tree Line Stencil included and a idea was formed.

After picking out some inks that best matched the challenge colors,

I decided to just to go for it!

Using an oversize piece of white cardstock, started at the bottom, and lined up my tree to ink.


I used a piece of masking paper over the top of the stencil and the rest of the cardstock.

I would not want to accidentally ink over anything I did not want inked.

I slowly added color to each of the trees using a smaller blender brush.

I alternated colors as I went and tried very hard not to over ink the image.


With all three rows done, I heat set my ink and placed the image aside to dry.

For the next part you MUST make sure your inked image is dry.

Using clear Versamark ink I used the center part of

the stencil and inked on the babbles and tinsel.


I added on my favorite Holographic embossing powder (I know you have some)

I made sure that the row was heat set all the way before moving to the next row.

With all three rows done, I lined up my inked images

 in the A7 Frames and Banners Die and die cut out my card front.

I also created a card base with the same die set.

To finish this card, I use a sentiment from the NEW Snowflake Oval.

This is inked on to a circle created front the circle frames die.

I backed the sentiment with a die cut circle made of Holographic card stock.

I also added on a few Holographic Gems to finish my card.


This card is done!

I Hope this gives you a bit of inspiration for your next project.

Make sure you share your projects by using the link in

the challenge picture above.

You could be 


OR


to receive a $20 Store Credit to Newton's Nook Designs!

using random.org

    Are you social?

Follow me on Instagram

at 2.sistersproject

and

Newton’s Nook Designs

Also use the following hashtags

#inkypawschallenge

#newtonsnook

#newtonsnookdesign


Thanks so much for visiting.


STAY SAFE AND STAY CRAFTY.

DIANE

Wednesday, October 19, 2022

Spooky - Simon Says Stamp Wednesday Challenge


THIS WEEK’S THEME AT THE

Simon Says Stamp Wednesday Challenge

SPOOKY

Featuring products by

SIMON SAYS STAMP

You do not have to use the featured company to join in.

But… If you have some of their product in your stash

We would LOVE to see them used.

Here is my take on this challenge.


For this card I used the following product

HOME SWEET HAUNTED HOME CLEAR STAMP SET

RIVER DAMASK EMBOSSING FOLDER

To start this card, I created a shaped card base using black cardstock and my set of Nesting Circle dies.

To create the card front I used a circle die two sixes smaller than my card base.

I did not want to go with traditional colored, so I opted on Soft Navy cardstock.

I die cut my circle out first and then ran the circle thru the RIVER DAMASK EMBOSSING FOLDER.

I added the embossed circle to the front of my card with the de-bossed side up.


I stamped out the images I wanted to use from the HOME SWEET HAUNTED HOME CLEAR STAMP SET.

Using Distress Watercolor Pencils, I colored my images in.

I also used my markers to add a bit of details on the images.

To the moon stamp I used my Metallic Flip Markers to add some sparkle.


I die cut all the images out and added them to the front of the card with foam tape.

Finally, I stamped out the sentiment.

To the “spooky” part of the sentiment I added a pinch of Black Sparkle embossing powder and heat set.

This gives a bit of bling with the card is moved around.


This completes my take on SPOOKY

Featuring SIMON SAYS STAMP

I almost forgot the good news!


The lovely folks over at Simon Says Stamp are generously giving away

a FABULOUS $25 voucher to shop at the  Simon Says Stamp Store! 

All you must do is take out your crafty supplies,

 make something following this week’s prompt,

and add a link in the Inlinkz at the bottom of this post!

You can join five times so you could have five chances to win! How IMPRESSIVE is that!!

All winners are chosen randomly, so everyone has an equal chance to win!


GOOD LUCK TO EVERYONE!


Like the products I used.

I have direct links to everything below.


Thanks so much for stopping by.

Sending HUGE Hugs

Stay Safe and Stay Crafty

Diane


HERE ARE THE SUPPLIES TO CREATE THIS CARD


Home Sweet Haunted Home Clear Stamp Set by Simon Says Stamp

River Damask Embossing Folder by Simon Says Stamp

Nesting Circle Dies by Simon Says Stamp

BlackBlack8 Card Stock by Simon Says Stamp

Soft Navy Card Stock by Simon Says Stamp

Distress Watercolor Pencils by Ranger Ink

Metallic Flip Markers by Spectrum Noir

Onyx Black Versa Fine Ink by Tsukineko

Black Sparkle Embossing Powder by Ranger Ink

Spectrum Noir Classique Markers (color in the image)


Do you use Instagram? 

Check out the Simon Says Stamp Page

Follow me on Instagram

at 2.sistersproject

ALSO, please add #ssswchallenge to your challenge entry uploads so we can see them on there too.