Monday, May 29, 2023

Inky Paw's Challenge 199 - Rainbow Theme


Hello Inky Paws Fans!

We have a NEW challenge coming your way.

Here is my take on the challenge.
For this challenge I used the following Newton’s Nook Design’s product.

Heartfelt Meows

Heart Frames Die Set

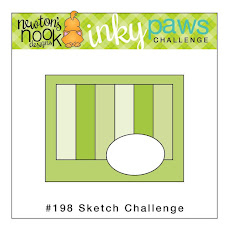
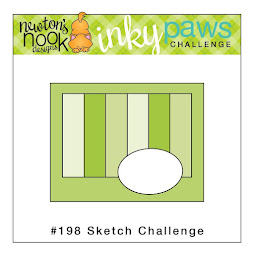
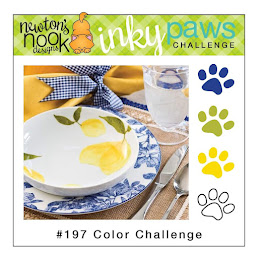
My take on the challenge this week is crafty good fun!

I went 
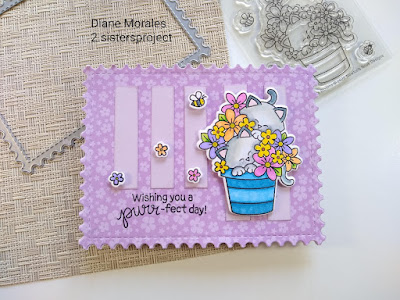
into my paper stash and chose some bold colors to create my rainbow background.

My cardstock is cut down to ½ inch strips of each of the rainbow color.


To add extra support for my card front, I glue my strips on to a piece of white cardstock.

After the glue is dry, I used the largest heart from

 the Heart Frames Die Set to create my card front.

I also used the same heart die to create my shaped card base with white cardstock.

While the card front was drying, I stamped and colored the image from Heartfelt Meows.

 I kept the toy colors rainbow and the cat’s colors neutral.

My colored image is cut out with the scalloped heart, and I assembled my card.


I created a simple banner using one of the sentiments from Heartfelt Meows

This banner is cut down to fit on the front of the card.

Using gel pen I added bling to the letters.

A few white gems make this card complete.


I Hope this gives you a bit of inspiration for your next project.

Make sure you share your projects by using the link in

the challenge picture above.


For a chance to be


OR


to receive a $20 Store Credit to Newton's Nook Designs!

using random.org

Are you social?

Follow me on Instagram

at 2.sistersproject

and

Newton’s Nook Designs

Also use the following hashtags

#inkypawschallenge

#newtonsnook

#newtonsnookdesign


Sunday, May 21, 2023

Inky Paw's Challenge 198 - Sketch Challenge

Hello Inky Paws Fans!

We are at the halfway point of this current challenge.

Here is my take on the challenge.

For this challenge I used the following Newton’s Nook Design’s product.

Newton Blooms

Spring Bloom 6x6 Paper Pad

Frameworks Die Set

Hello and welcome!

For my take on the challenge, I started with a card base make

from lilac cardstock and the Scalloped edge from the Frameworks Die Set.

I just wanted this card to pop with flowers.

Using the matching purple flower paper from the Spring Bloom 6x6 Paper Pad,

I cut out a background with the same scalloped die as my card base.

Next, using the same lilac card stock as I used for the card base,

 I created ¼ inch strips to be the background elements for the card.

 the first 3 strips that I applied to the front of my card I cut down to 2 ¼ inches.


This left a place for me to have a sentiment.

Once all the stripes were glued down, I stamped out my image from Newton Blooms.

I colored my image using bright eye-catching colors.

I also stamped out some of the extras for the front of the card.

After cutting out my image with a die cutting machine,

I attached this image to the front of my card with foam tape.

I also added a few extra flowers and a bee.


I hope this gives you a bit of inspiration for your next project.

Make sure you share your projects by using the link in

the challenge picture above.


For a chance to be


OR


to receive a $20 Store Credit to Newton's Nook Designs!

using random.org

Are you social?

Follow me on Instagram

at 2.sistersproject

and

Newton’s Nook Designs

Also use the following hashtags

#inkypawschallenge

#newtonsnook

#newtonsnookdesign


Thanks so much for visiting.


STAY CRAFTY.

DIANE 


Sunday, May 14, 2023

Inky Paw's Challenge 198 - Sketch Challenge


Hello Inky Paws Fans!

We have a NEW challenge coming your way.

Here is my take on the challenge.


For this challenge I used the following Newton’s Nook Design’s product.

Kitten Beach

Spring Bloom 6x6 Paper Pad

A7 Frames and Banner Die Set

Newton Blooms (grass by the chair)

Spring Roundabout (sentiment)

 I started this card by creating the base for this card.

I used grass green cardstock and the A7 Frames and Banner Die Set.

I also created a background from the same cardstock.

Next, came the panels for the background.

 I knew that I wanted to use the tulips page from the Spring Bloom 6x Paper Pad.

I am NOT a technical card maker, so how to create

these panels in a simple way will be a challenge.

After measuring the background, I decided the panels could be no longer than 3 inches.

I need room for the sentiment at the bottom.

The paper is 6 inches wide.

I needed 6 panels, ok 1 inch each.

But…. I waned a slight gap between each panel, so I wound make the panel ¾ of an inch.

Final panel size ¾ x 3inches

I started by chopping a bit of the grass off the bottom of the paper.


Then I trimmed the top by the tulips to 3 inches.

Next, I trimmed the tulips into one-inch stripes.

I DID NOT trim the strip into ¾ first, because it would leave

too much of a gap between each panel causing the tulips not to line up.

Instead, I took each panel in sets of two and trimmed them to ¾ together.

This will keep the tulips lined up when the panel is glued to the card front.

I started with the left panel and slowly glued the panels on one by one.

I checked the placement as I went to make sure that I was gluing to panel as straight as possible.

I placed the card front aside to dry and stared to stamp out my image from the Kitten Beach.

I attached my image to the front of the card with foam tape.

I also stamped on my sentiment from Spring Roundabout.

The card needs a bit of something else.


I decided to add some stamped out grass from Newton Blooms.

Adding on the grass completes my take on the challenge

I Hope this gives you a bit of inspiration for your next project.

Make sure you share your projects by using the link in

the challenge picture above.


For a chance to be


OR


to receive a $20 Store Credit to Newton's Nook Designs!

using random.org

Are you social?

Follow me on Instagram

at 2.sistersproject

and

Newton’s Nook Designs

Also use the following hashtags

#inkypawschallenge

#newtonsnook

#newtonsnookdesign


Thanks so much for visiting.


STAY CRAFTY.

DIANE


Monday, May 8, 2023

Inky Paw's Challenge 197 - Color Challenge


Hello Inky Paws Fans!

We are at the halfway point of this current challenge.


Here is my take on the challenge.

For this challenge I used the following Newton’s Nook Design’s product.

Heartfelt Roses

Serene Stripes Stencil

Heart Frames Die Set

Banner Trio Die

I started this card by creating the background for this card.

First, I inked up the Serene Stripes Stencil onto white cardstock


Next, I added ink over the stripes that I created.


I let the ink dry and then misted a bit of water on top to let the ink wick.


When the ink was completely dry, I die cut out my background

 with the largest of the Heart Frames Die Set.

For my card front I stamped and colored the roses from Heartfelt Roses.

I used the scalloped hearts from Heart Frames Die Set.

To assemble my card, I created a card base out of the largest heart die.

I glued my background to the base and then added my scalloped heart to the front with foam tape.

I stamped a sentiment on a banner that I created from the Banner Trio Die.

After folding the banner into the shape that I needed, I added the banner to the front of the card.


This completes my take on this challenge.

I Hope this gives you a bit of inspiration for your next project.

Make sure you share your projects by using the link in

the challenge picture above.


For a chance to be


OR


to receive a $20 Store Credit to Newton's Nook Designs!

using random.org

    Are you social?

Follow me on Instagram

at 2.sistersproject

and

Newton’s Nook Designs

Also use the following hashtags

#inkypawschallenge

#newtonsnook

#newtonsnookdesign


Thanks so much for visiting.


 STAY CRAFTY.

DIANE