Showing posts with label Heartfelt Roses. Show all posts

Monday, February 5, 2024

Let Love Bloom

Hello and Welcome

I cannot believe that it is February already.

I have a fun and versatile card to share with you today.

This card could be Valentine with a change in the sentiment.

Or just leave the sentiment as is to create a fun friendship card with LOTS of love!


For this card I used 

Birdhouse Greetings

Love and Meow’s 6x6 Paper Pad

Oval Frames Die Set.

Heartfelt Roses (sentiment at the bottom)


To start this card, I used the envelope background paper from

 the Love and Meow’s 6x6 Paper Pad. 

I cut a 3 ½ x 5 ½ slice of the paper, I wanted the card front to be slim 

and long to fit the dimensions of the stamp I was using.

To add a bit of color I used my Prawn (R24) Copic marker and 

added a red edge all around the cut edge of the paper.


I created a card base out of white card stock to fit the card front card front 

 I just created and glued the two pieces together.

While the card base was drying, I stamped out the image that I wanted to use.

I decided on the heat shape topiary and birdhouse from Birdhouse Greetings.

I colored my image with Copic markers in bright colors to stand out against the background

I also used the Oval Frames Die Set and die cut an oval out of velum.

To attach my image to the card, I used foam tape and attached the image to the velum first.

I hid my glue behind my stamped image and glued everything to the front of the card.


Using foam tape, I glued on a couple extra purple butterflies.

To finish this card, I stamped a sentiment from Heartfelt Roses onto red card stock.

This is heat embossed with white embossing powder.

After banner cutting both edges, I attached the sentiment to the front with foam tape.

I hope that you enjoyed my card and I hope that you try out a card like this for fun.

Links to the product are above.


Have an awesome day


Stay crafty my friends!

Diane


Monday, May 8, 2023

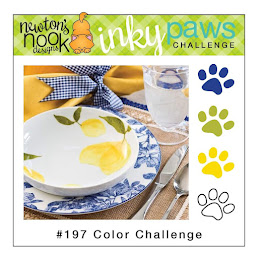
Inky Paw's Challenge 197 - Color Challenge


Hello Inky Paws Fans!

We are at the halfway point of this current challenge.


Here is my take on the challenge.

For this challenge I used the following Newton’s Nook Design’s product.

Heartfelt Roses

Serene Stripes Stencil

Heart Frames Die Set

Banner Trio Die

I started this card by creating the background for this card.

First, I inked up the Serene Stripes Stencil onto white cardstock


Next, I added ink over the stripes that I created.


I let the ink dry and then misted a bit of water on top to let the ink wick.


When the ink was completely dry, I die cut out my background

 with the largest of the Heart Frames Die Set.

For my card front I stamped and colored the roses from Heartfelt Roses.

I used the scalloped hearts from Heart Frames Die Set.

To assemble my card, I created a card base out of the largest heart die.

I glued my background to the base and then added my scalloped heart to the front with foam tape.

I stamped a sentiment on a banner that I created from the Banner Trio Die.

After folding the banner into the shape that I needed, I added the banner to the front of the card.


This completes my take on this challenge.

I Hope this gives you a bit of inspiration for your next project.

Make sure you share your projects by using the link in

the challenge picture above.


For a chance to be


OR


to receive a $20 Store Credit to Newton's Nook Designs!

using random.org

    Are you social?

Follow me on Instagram

at 2.sistersproject

and

Newton’s Nook Designs

Also use the following hashtags

#inkypawschallenge

#newtonsnook

#newtonsnookdesign


Thanks so much for visiting.


 STAY CRAFTY.

DIANE


Monday, February 21, 2022

Inky Paw's Challenge 167 - Color Challenge


Hello Inky Paws Fans!

We are at the halfway point of this current challenge.

Here is my take on the challenge colors!


For this challenge I used the following Newton’s Nook Design’s product.

Orchids Stamp Set

A7 Frames and Banner Die

Sea Boarders Die Set

Frameworks Die Set

Heartfelt Roses Stamp Set (sentiment)

Here is my take on the challenge.

 Loving this NEW A7 Die Set, the large size makes for some great cards.

 I used three of the challenge colors and die cut strips of card stock 2 ¼ inch wide.

 Using the Sea Boarders Die Set, I die cut the pieces to fit together like a puzzle.

This is glued down to card base made with the A7 Frames and Banner Die.


Next, I turned my attention to the orchids.

I stamped and die cut out 2 pieces and added some color the center and the stems.

The last component is the frame die cut from the Frameworks Die Set.

This is cut three times out of white card stock, glued together, and covered in Moon Dust Stickles.

The card base was now dry, so I was able to stamp the sentiment on the card.

To make the sentiment stand out I used white embossing powder.

Then, I layered on my open frame.

The orchids are next. I used foam tape to pop up the front flower.

Some giant pearls finished this card.

That completes my take on this challenge.


 Now it is your turn!

Show us your take on our fun color challenge

 DON’T FORGET

Share your projects by using the link in

the challenge picture above.

You could be


OR


to receive a $20 Store Credit to Newton's Nook Designs!

using random.org

Do you use Instagram?

Tag us using!

#inkypawschallenge

#newtonsnook

#newtonsnookdesigns

Thanks so much for dropping by.


STAY SAFE AND STAY CRAFTY.

DIANE 


Monday, February 14, 2022

Inky Paw's Challenge 167 - Color Challenge


Hello Inky Paws Fans!

We have a NEW challenge coming your way.

Here is my take on the challenge colors!


For this challenge I used the following Newton’s Nook Design’s product.

Heartfelt Roses Stamp Set

Heart Frames Die

Frames and Flags Die Set

Petite Heart Stencil

To start the front for this card I used the large scallop from the Frames and Flags Die Set.

Once the shape was die cut out, I used the Petite Hearts Stencil and

 the embossing mat that works for my die cut machine

 and I pressed the Petite Hearts Stencil into white card stock.

It is IMPORTANT to check to recommendations for the die cut machine that you own

on how to do this technique, so you do not damage the stencil or your machine.

Also, it helps to use 80lbs or higher card stock to get a good impression.

Next, I stamped and colored the heart from the Heartfelt Roses Stamp Set

This heart is die cut out using the Heart Frames Die.


To assemble the card, I started by first die cut out banners using the challenge colors.

These colored banners are glued to the back of the heart in ascending order.

At this moment I remembered that I forgot to stamp on the sentiment.

Holding my breath, I very carefully stamped on the green banner.

To finish this card up, I create a card base and attached my embossed panel to this base.

I popped up my heart and banners with foam tape and attached that to the card.

To finish everything off, I added on gold hearts for a bit of bling.


 Now it is your turn!

Show us your take on our fun  Color Challenge 

DON’T FORGET

Share your projects by using the link in

the challenge picture above.

You could be


OR


to receive a $20 Store Credit to Newton's Nook Designs!

using random.org

Do you use Instagram?

Tag us using!

#inkypawschallenge

#newtonsnook

#newtonsnookdesigns

Thanks so much for dropping by.


STAY SAFE AND STAY CRAFTY.

DIANE