Wednesday, July 17, 2024

Newton's Nook Designs 11 Year Celebration - Day 3


Hello Everybody!

It is day three of our New Release!

Today’s release is SO YUMMY!

Newton Loves Pizza Stamp Set 

Using this stamp set I created this card.


 The plan for this card is simple keep everything nice and neutral.

I started out by choosing three different papers from the Natural Basics Paper Pad

I liked the idea of kraft cardstock with these papers, and a sentiment on the upper right rectangle.

 Die cutting all my pieces out using the A2 CardLayout 2 Die Set came first.

Creating a card base out of the craft card stock came next.

Then I glued down the frame from the A2 Card Layout 2 Die Set on to the base.

I pieced in the card stock choices into the cut outs.


 A stamping block on top of the card front is necessary to wait for all the glue to set up.

While the glue was drying, I stamped out the image from Newton Loves Pizza Stamp Set

This is such a cute stamp set and I had so much fun coloring it.

 Needing to make my pizza box more authentic, I went on Google to check out

 pizza box images and decided to add ridges on the bottom of the box.

My finished image is die cut out and I checked the placement

of my image on the front of my card and then stamped on my sentiment accordingly.

I then added my image on the front of the card with foam tape.


A couple my favorite enamel dots complete this project

I hope you enjoyed my take these latest items that we have on this release.

This and all the other fun latest items are available Thursday, July 18


Happy Shopping!


Thanks so much for stopping by.

Stay craft everyone!


 DIANE 


Enter to Win a $25 Prize!

One lucky winner will receive a $25 prize to spend at Newton's Nook Designs online shop!

The winner will be chosen at random from the collective blog posts featuring our new products this week.

 For a chance to win, leave comments on the Design Team Member Blog Posts

(see list below) from Monday July 15 through Wednesday July 17th.

You will not know which blog has been chosen so

the more you comment on the better your chances are of winning!

You have until Thursday, July 17th at 9 pm ET to comment –

winners will be announced on the NND blog on Thursday, July 18th.


Check out all the awesome Design Team Blogs below to enter:

Newton's Nook Designs

Donna Idlet

Larissa Heskett

Samantha Mann

Diane Morales

Farhana Sarker

Amanda Wilcox


Want another chance to win?

 We will be having an Instagram hop on Thursday with a second prize!

 Please join us over on Instagram on Thursday, July 18 for details!


Tuesday, July 16, 2024

Newton's Nook Designs 11 Year Celebration - Day 2

Hello Everybody!

It is day two of our NEW Release!

this NEW die is going to elevate your card front making to the next level.

A2 Card Layout 2 Die Set 


I started this card by grabbing the NEW Natural Basics Paper Pad.

I chose three different papers will be the papers for the inside of three of the cut outs.

 I knew that I wanted the top right-hand rectangle to be the

sentiment box so this rectangle would be white card stock.

After die-cutting all my papers, including white card stock using

the A2 Card Layout 2 Die Set, I assembled my pieces.

I always glue down my card fronts on top of a second white card stock base.

This keeps the card front from warping when drying and gives a nice rigid card front.

This die is so easy to put together, I started with glueing the frame for

all the boxes down first and then glued in each cutout.


Once the pieces were all assembled, I used a stamp block to keep things extra flat while the glue dried.

 Next, I got out the Newton Loves Boxes Stamp Set and stamped

 out all the images that I wanted to use.

 When coloring I kept the colors very neutral to match the card stock in the background.

Since this is a birthday themed card, I also stamped birthday hats from Newtons Birthday Delight

Assembling the card is so easy!

I stamped my sentiment into the upper right corner rectangle.

I trimmed up my card front and attached it to a card base.


Then I decided on the placement of my stamped image and added them to the card front with foam tape.

I die cut out my colored birthday hats and added those to the kitties.

 I use my shimmer pen on the boxes and the birthday hats.

I also added three of my favorite white gems.

I hope you enjoyed my take on the fun and unique stamp set.


This and all the other fun latest items are available Thursday, July 18


Happy Shopping!


Thanks so much for stopping by.

Stay craft everyone!


DIANE


Enter to Win a $25 Prize!

One lucky winner will receive a $25 prize to spend at Newton's Nook Designs online shop!

The winner will be chosen at random from the collective blog posts featuring our new products this week. 

For a chance to win, leave comments on the Design Team Member Blog Posts

(see list below) from Monday July 15 through Wednesday July 17th.

You will not know which blog has been chosen so

the more you comment on the better your chances are of winning!

You have until Thursday, July 17th at 9 pm ET to comment –

winners will be announced on the NND blog on Thursday, July 18th.


Check out all the awesome Design Team Blogs below to enter:

Newton's Nook Designs

Donna Idlet

Larissa Heskett

Samantha Mann

Diane Morales

Farhana Sarker

Amanda Wilcox


 Want another chance to win?

 We will be having an Instagram hop on Thursday with a second prize!

 Please join us over on Instagram on Thursday, July 18 for details!


Monday, July 15, 2024

Newton's Nook Designs 11 Year Celebration - Day 1


Hello Everybody!

Who is ready for the July release!

These new products are going to make your cardmaking so easy!

Today we have the

Fractured Card Layout Die Set

Using this die I created this card 


I chose to pair this die with the NEW Black and White Basics Paper Pad.

I am so excited for the two new paper pads.

Both these pads are neutral colors that blend so well with our current paper pads.

To start my card, I chose three different patterns from the Black and White Basics Paper Pad.

I die cut out each of the pieces of paper that I chose and place them aside.

To create a distinct separation between all the designs, I used black cardstock with the fractured die.

I like to glue my card front down onto a separate piece of 65 lbs. card stock

 This technique gives me a nice robust card front that will not bend while the glue is setting

The fractured card layout looks complicated, but it is not.

I just started in one corner and built my card front piece by piece.


 Of course, I had the die in front of me for reference the first couple of times.

I can assure you after piecing this die together after a couple of times everything just falls into place.

And … you have all the extra pieces to use later in other card fronts.

Placing a stamp block on the card front while it is drying helps the card front to stay flat.

While this is being set up, I stamped and colored my image from the Newton Blooms Stamp Set.

I also stamped and colored extra butterflies.

To create a banner, I went to my go to favorite die set the Frames and Flags Die Set.

Once my banner is die cut out, I stamped on my sentiment.

My images are now die cut out I am ready to assemble my card.

I started by trimming my card front and attaching the card front to a card base.

Next, I decided on the placement of my Newtons Bloom image and my banner.

I attach those to my card front with foam tape.


For a finishing touch I added butterflies around the image to complete the card.

I had a blast with this new die!

I have been using this die with all my leftover pieces of scraps

 and having the best time creating card fronts.

This and all the other new products will be available on ThursdayJuly 18


Happy Shopping!

Thanks so much for stopping by.

Stay craft everyone!


DIANE


Enter to Win a $25 Prize!

One lucky winner will receive a $25 prize to spend at Newton's Nook Designs online shop!

The winner will be chosen at random from the collective blog posts 

featuring our new products this week. 

For a chance to win, leave comments on the Design Team Member Blog Posts

(see list below) from Monday July 15 through Wednesday July 17th.

You will not know which blog has been chosen so

the more you comment on the better your chances are of winning!

You have until Thursday, July 17th at 9 pm ET to comment –

winners will be announced on the NND blog on Thursday, July 18th.


Check out all the awesome Design Team Blogs below to enter:

Newton's Nook Designs

Donna Idlet

Larissa Heskett

Samantha Mann

Diane Morales

Farhana Sarker

Amanda Wilcox


Want another chance to win? We will be having an Instagram hop on Thursday with a second prize! 

Please join us over on Instagram on Thursday, July 18 for details!


Monday, July 1, 2024

Buzz.... worthy Bookmark

Hello Everyone!

 Up on the Newton’s Nook blog todaywith 

this fun bookmark using products from the new release!


For this bookmark I used

Beekeeper Newton

Honeycomb Hot Foil Plate

Bookmark 2 Die Set

Circle Frames Die Set

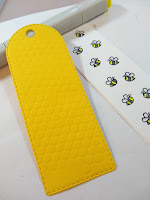
To start this bookmark, I use the Honeycomb Hot Foil Plate after it is heated up,

I pressed the hot foil plate into yellow card stock that was sprayed lightly with water.

I pressed honeycomb plate several different ways making sure

 I had enough of the pressed paper to use with the Bookmark Die

You must let the paper cool down completely before you can die cut or use the paper.

Once the paper was cooled, I cut out my pressed paper using the Bookmark 2 Die Set.

I shortened the bookmark slightly by running the pressed paper through the bookmark die a second time.

 
With the bookmark ready I stamped out the beehive and a

whole bunch of bees from Beekeeper Newton Stamp Set

I colored in all my images and die cut everything out.

Assembling this bookmark was easy!

To break up all the yellow color I used one of the circles die from

 the Circle Frames Die Set and white card stock.

I attach my beehive to that circle first and then attached all my bees around

the hive popping up some of them with foam tape.


I Created a banner using the sentiment from the from Beekeeper Newton.

I finished this bookmark by adding some yellow, black, and white twine to the top.

I also added a few of my favorite white gems.

I hope you get to try this bookmark for yourself!

 Thanks for stopping by

  Hope you have an awesome day

 Stay crafty my friends!

Diane