Wednesday, January 12, 2022

Inky Paw's Challenge 164 - Color Challenge


Hello Inky Paws Fans!

We have a NEW challenge coming your way.

Welcome back and a VERY Happy New Year!

Check out this challenge! 


For this challenge I used the following Newton’s Nook Design’s product.

Newton Celebrates

Newton’s New Year

Frames and Flags Die Set


The question was “how to use the colors”

I decided since the red was the bolder of the colors. This would become the card base.

I used the Large Scalloped Rectangle in the Frames and Flags Die Set to create the card base.

A simple die cut square of Kraft card stock on top of the red completed the card base.

I dug into my paper stash to find some cream card stock and die cut a piece out

 using the Curved Edge Rectangle that is included the Frames and Flags Die Set.

This would be the start of my card front.


I wanted a little something behind the image I was going to use.

 the “celebrate” from Newton Celebrates was used to stamp the on the diagonal in the corner.

To finish my card, I stamped and colored my image.

Once that was attached to the front of the card, I stamped on a sentiment.

The sentiment is included in the Newton’s New Year Stamp Set.


To finish my card, I added some bling above my popped bottle.

I also colored in my champagne with a silver Sharpie.

That completes my take on this challenge.

 Now it is your turn!

Show us your take on these fun challenge colors!


DON’T FORGET

Share your projects by using the link in

the challenge picture above.

You could be


OR


to receive a $20 Store Credit to Newton's Nook Designs!

using random.org

Do you use Instagram?

Tag us using!

#inkypawschallenge

#newtonsnook

#newtonsnookdesigns

Thanks so much for dropping by.


STAY SAFE AND STAY CRAFTY.


DIANE


Fun With Stencils - Simon Says Stamp Wednesday Challenge


THIS WEEK’S THEME AT THE

Simon Says Stamp Wednesday Challenge

Fun With Stencils

Featuring stamps and dies by

Tim Holtz

You do not have to use the featured company to join in.

But… If you have some of their product in your stash

We would LOVE to see them used.

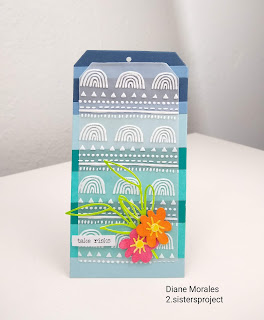
Here is my take on this challenge.


My Stencil of choice for this challenge is:

The Tim Holtz Mini Stencil Set #51

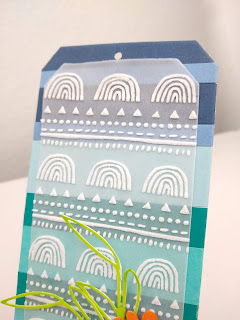
So excited to share all the fun elements on this Tag with you.

It all starts with the tags base.

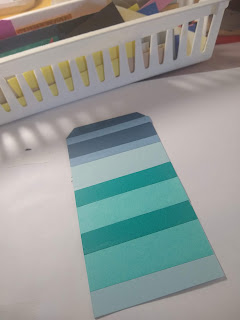
For this I went into my scrap basket and picked out a bunch of coordinating strips of paper.

I decided on a pattern and glued the strips down onto plain white card stock.


While the paper was drying, I decided how I wanted to work with the stencil.

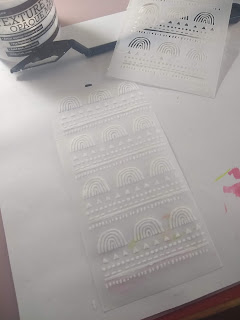
 I was feeling a bit experimental and thought about trying texture paste and vellum with the stencil.

First, I cut out the vellum with a tag die cut.

To make the vellum stable to work with, I had to tack the vellum tag down with double sided tape.

Next, I placed the stencil on top of the vellum and carefully smeared the texture paste over the top.

I slowly lifted the stencil to revel the design. I left the vellum tag to dry still tacked down to the tape.


To finish up this tag, I first die-cut out my homemade striped paper with a tag die.

I added on my vellum layer with spray adhesive so that the vellum layer

 would dry clear, and you could still see the colors that I used in the background.

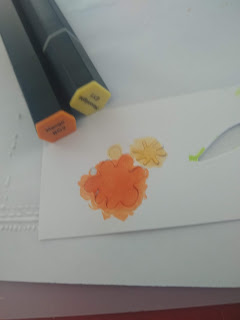
I chose flowers from the Funky Floral #2 dies and die cut them out.

Using my Spectrum Noir Markers, I added some color to the flowers.


The flowers are added to the front of the tag with foam tape.

Finally, I chose the sentiment “take risks” from the small talk stickers book.

Some Gold Stickles on the flowers finished this tag.


This completes my take on Fun with Stencils

Featuring Tim Holt

I almost forgot the good news!


The lovely folks over at Simon Says Stamp are generously giving away

a FABULOUS $25 voucher to shop at the  Simon Says Stamp Store! 

All you must do is take out your crafty supplies, make something following this week’s prompt,

and add a link in the Inlinkz at the bottom of this post!

You can join 5 times so you could have 5 chances to win! How AWESOME is that!!

All winners are chosen randomly, so everyone has an equal chance to win! 

GOOD LUCK TO EVERYONE!

 Like the products I used.

I have direct links to everything below.

Thanks so much for stopping by.

Sending HUGE Hugs

Stay Safe and Stay Crafty

Diane


HERE ARE THE CRAFTY PRODUCTS I USED:

Tim Holtz MiniStencil Set 51 by Stampers Anonymous

Stacked Tag Dies by Tim Holtz/Sizzix

Funky Floral 2 Thinlits Die by Tim Holtz/Sizzix

Small Talk Stickers by Tim Holtz

Vellum by Simon Says Stamp

Audrey Blue Card Stock by Simon Says Stamp

Soft Navy Card Stock by Simon Says Stamp

Cornflower Card Stock by Simon Says Stamp

Surf Blue Card Stock by Simon Says Stamp

Peacock Teal Card Stock by Simon Says Stamp

#120 White Card Stock bySimon Says Stamp

Texture Paste Opaque Matteby Ranger Ink

Gold Stickles by Ranger Ink

Spectrum Noir Classique Markers (color in the image)

Fun Foam (pop up the layers)


Do you use Instagram?


If so, please add #ssswchallenge to your challenge entry uploads so we can see them on there too.


Monday, January 10, 2022

Inky Paw's Challenge 164 - Color Challenge

Hello Inky Paws Fans!

We are at the halfway point of this current challenge.

Here is my take on the challenge!


For this challenge I used the following Newton’s Nook Design’s product.

Heartfelt Love

Heart Frame Die Set

Banner Trio Die Set

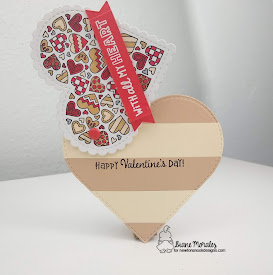
To create the top part of my card, I first stamped out my image from the Heartfelt Love Stamp.

Using the challenge colors, I colored all the hearts in.

I tried to keep a good balance of color keeping in mind that

I was going to be using a red banner for my sentiment.

Now that all the color was done, I die-cut out my heart using the Heart Frame Die Set.


These were glued to a basic piece of white card stock.

These two layers will keep the card base nice and rigid.

Once the glue was dry, I die-cut out my base with largest heart from the Heart Frame Die Set.

To assemble my card, I lined up the top and bottom of the card together.

I marked a place with my pencil where I wanted the brad to go.

Then using an awl (with a craft mat underneath) I punched a hole in my card.


I did not use a hole punch, because the many layers of this card are too thick for the average hole punch.

After adding in my brad and testing the hinge, I noticed that the card did not move smoothly.

A piece of heavy cardstock glued to back of the top layer will create a spacer for the brad.

To finish this card, created a banner using red card stock and the Banner Trio Die Set.

I embossed on my sentiment and added my banner to the front with foam tape.

I slid open the card and stamped on the suprise sentiment.

For a final touch I added some bling with a silver gel pen to my gray hearts.


That completes my take on this challenge.

 Now it is your turn!

Show us your take on  this color challenge. 

DON’T FORGET

Share your projects by using the link in

the challenge picture above.

You could be


 OR


to receive a $20 Store Credit to Newton's Nook Designs!

using random.org

Do you use Instagram?

Tag us using!

#inkypawschallenge

#newtonsnook

#newtonsnookdesigns

Thanks so much for dropping by.


STAY SAFE AND STAY CRAFTY.


DIANE


Wednesday, January 5, 2022

Something New - Simon Says Stamp Wednesday Challenge


THIS WEEK’S THEME AT THE

Simon Says Stamp Wednesday Challenge

SOMETHING NEW

Featuring stamps and dies by

The Rabbit Hole Designs

You do not have to use the featured company to join in.

But… If you have some of their product in your stash

We would LOVE to see them used.

Here is my take on this challenge.


My Crafty Items of choice for this challenge is:

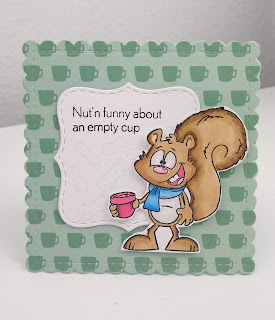
Clarence Coffee Clear Stamp Set

So excited to share all the fun elements on this card with you.

Hello and Happy New Year!

So exited to see what this year is going to bring!

Also, to share lots of crafty inspiration with everyone.

To start off this New Year I have the pleasure of working with a stamp company

that I have never used before Rabbit Hole Designs.

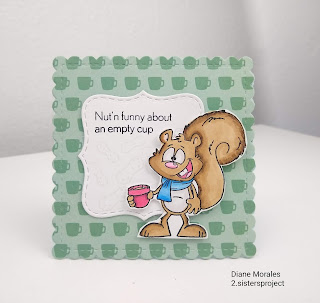
I started my card by making a shaped card base using paper

from Coffee House stories By Newton’s Nook Design.

I also used the Square Frames Die Set.


Once my card base was created, I stamped and colored my image.

Before I added my image to the front of the card, I used a decorative square from

the same die set, and white card stock to create a place for my sentiment.

 To finish this card, I stamped on the nuts to fill up the white space and

added on my image to the front of the card with foam tape.


This completes my take on SOMETHING NEW

Featuring THE RABBIT HOLE DESIGNS

I almost forgot the good news!


The lovely folks over at Simon Says Stamp are generously giving away

a FABULOUS $25 voucher to shop at the  Simon Says Stamp Store! 

All you must do is take out your crafty supplies, make something following this week’s prompt,

and add a link in the Inlinkz at the bottom of this post!

You can join 5 times so you could have 5 chances to win! How AWESOME is that!!

All winners are chosen randomly, so everyone has an equal chance to win!


GOOD LUCK TO EVERYONE!


Like the products I used.

I have direct links to everything below.

Thanks so much for stopping by.

Sending HUGE Hugs

Stay Safe and Stay Crafty

Diane


HERE ARE THE CRAFTY PRODUCTS I USED:

Clarence Coffee Clear Stamp Set by The Rabbit Hole Designs

Frames Squared Die by Newton’s Nook Designs

Coffee House Stories 6x6 Pad by Newton’s NookDesigns

#120 White Card Stock bySimon Says Stamp

Mint Card Stock by Simon Says Stamp (card base)

Smoke Ink Pad by Simon SaysStamp

Onyx Black Versa Fine Ink byTsukineko

Spectrum Noir Classique Markers (color in the image)

Fun Foam (pop up the layers)


Do you use Instagram?


 If so, please add #ssswchallenge to your challenge entry uploads so we can see them on there too.