Monday, October 30, 2023

Newton's Nook Designs Holiday Release - Hot Foil Plates


Hello Newton’s Nook Fans!

Today we are featuring


Using these hot foil plates and stamps I came up with the following


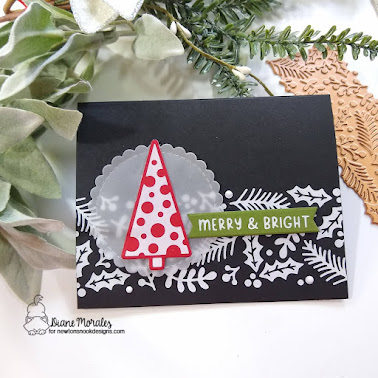
For the Holiday Foliage Hot Foil Plate, I used a green prism foil on black cardstock.

Using the Christmas Trees Hot Foil Plates & Die I used white foil on red card stock.


To create the card, I used my favorite die Frames And Flags Die Set as a card base.

Using the Holiday Greetings Hot Foil Plates and Banner Duo Die Set

I was able to create a quick super cute banner.


Using the Holiday Elements Stamp set I created these two tags.


In the background is the Holiday Foliage Hot Foil Plate.

I used the Labels Hot Foil Plate And Dies as a feature

area for the new Holiday Elements Stamp Set.

 Using the Fancy Edges Tag Set  I was able to create a quick tag.


This tag uses spent white foil that is glued onto pink card stock.

I used the Labels Hot Foil Plate And Dies as a feature

area for the new Holiday Elements Stamp Set.

Hope you enjoyed my take on these fun items

What to try for yourself?

We are having a SALE


 Thanks so much for visiting and sharing this fun release with me.


Stay crafty my friends

Diane


Newton's Holiday Release - Dog and Cat Christmas Tree


Hello Newton’s Nook Fans!

Today we are featuring


Using these stamps set I came up with the following cards

FOR THE CATS


I used the Oval Frames Die Set to make a shaped card base.

I bit of paper from the Meowy Christmas 6x6 Paper Pad makes a good base for the image.

I colored all the cats gray to make all the other colors pop.

A hand made banner with a sentiment completed this card.

FOR THE DOGS


I created a card base using the Canine Christmas 6x6 Paper Pad.

A background using the Frameworks Die Set and white cardstock.

I colored all the dogs in a neutral brown color.

Finished the card with a handmade banner for the sentiment.

Hope you enjoyed my take on these two fun stamp sets.

What to try for yourself?

We are having a SALE


 Thanks so much for visiting and sharing this fun release with me.


Stay crafty my friends

Diane


Newton's Holiday Release - Scandi Christmas


Hello Newton’s Nook Fans!

Today we are featuring

 Using this stamp set I came up with the following card and tag.


This is such a fun stamp set.

So many ways to use all the elements in the stamp set.

For the card I used Versamark ink and the long strip.

I just stamped my image on white cardstock and heat set with holographic embossing powder.

For the deer I chose winter colors and stamped the image on coordinating card stock.

I just love this stamp set and ended up stamping several colors of the dear

To see what would look best with the final card.

Using the Holiday Greetings Hot Foil Plates

I created a simple banner using prism foil.


Assembly was easy.

I placed my background on a matching card base.

I layered my deer on top with foam tape.

Added on my banner.

For a final touch, I add a few sparkling stars.


For the tag.


Stared with the star from the stamp set and gold ink.

I stamped the star on white cardstock in a random pattern.

One the ink was dry; I die cut out with the

Fancy Edges Die.

A leftover deer from the card project was added on with foam tape.

I stamped on the sentiment.

I finished with a few pink gems and gold ribbon.

Hope you enjoyed my take on this fun stamp set.

What to try for yourself?

We are having a SALE


 Thanks so much for visiting and sharing this fun release with me.


Stay crafty my friends

Diane 

Sunday, October 29, 2023

Newton's Nook New Holiday Release Blog Hop!


The Newton's Nook Designs Team is hopping along today with Inspiration

using our BRAND-NEW Holiday Products!

Make sure you scroll down to the bottom of this post to see the whole list

and hop along and comment for a chance to win!


Welcome Newton’s Nook fans!

I have a fun card to share with you using some of our NEW holiday goodies!


For this card I used 

Christmas Trees Hot Foil Plates & Die

Holiday Greetings Hot Foil Plates

Holiday Foliage Hot Foil Plate


I am a huge fan of putting a twist on traditional colors for Christmas.

 To make this bold card I started with the Holiday Foliage Hot Foil Plate.

I used the hot foil plate with white foil and heat set the image onto a 4 x 5 piece of black cardstock.

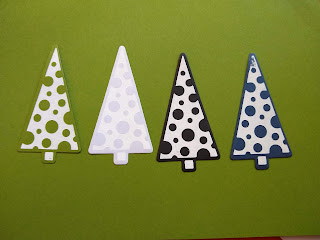
Next, I created the trees using the Christmas Trees Hot Foil Plates & Die.


 I created several colors of the trees using the white foil again against colored cardstock.

A simple die cut of a vellum scallop circle from the circle frames die will be the base for my tree.

Assembly was easy.

I attached the tree to my velum circle first using foam tape, and then attached the circle to my card.

I Adhered glue to the back of my tree only. So that I could still see through my velum circle.


Since I chose the red tree for this project, I went with a green banner, foiled with white foil and the

Holiday Greetings Hot Foil Plates.

Using the Banner Duo Die gave me a nice straight banner.


Want to try this card for yourself?? 

We are also having a sale beginning October 30th.


 Also

Enter to Win a $25 Prize!

We will be choosing two lucky winners to win a $25 store credit 

for Newton's Nook Designs online shop!

To enter, just leave comments on the Design Team Member blogs (see list below)!

Two winners will be chosen at random from the collective blogs in the blog hop.

Make sure to check out each of their blogs and comment for your chance to win.

You will not know which blog has been chosen so the more you comment

 on it the better your chances are of winning!

 You have until Thursday, November 2nd at 9 pm ET to comment.

 Winners will be announced on the NND blog on Saturday, November 4th.

Stay crafty my friends!

Diane


BLOG HOP LIST

Newton's Nook Designs 

Donna Idlet 

Ellen Haxelmans 

Larissa Heskett 

Samantha Mann 

Zsofia Molnar 

Diane Morales

Farhana Sarker 

Tatiana Trafimovich

Amanda Wilcox 


Sunday, October 15, 2023

Broom and Boos for October

Hello Newton’s Nook Fans!

It is my birthday month!

and ....

I have a fun birthday card to share with you using the Halloween Time Paper Pad.


I just love the sheet of paper with the eyeballs.


The perfect match for this paper is the Brooms and Boos Stamp set!

I started out with a gray card base.

Next, a two-inch strip of eyeball paper was glued onto the card front.

Coloring my image was next.

I am not the best at coloring so kept things simple

by using the colors on the eyeball paper as a guide.


I used a shimmer pen to add some bling to the “liquid” of the martini.

The stitched oval from the Oval Frames Die Set makes a great feature area

for my sentiment and image.

I simply attached to the oval to the front of the card and then my image on top with foam tape,

Finally, I used the stars in the stamp set to add interest

in the blank corners of my card and by the sentiment.

As always, a bit of bling with tiny green gems completes this card.


All the links to the product are in the blog post above.

Stay crafty my friends!

Diane