Monday, March 14, 2022

Inky Paw's Challenge 169 - Think Spring !


Hello Inky Paws Fans!

We have a NEW challenge coming your way.

Check out this fun challenge!


For the next two weeks we are thinking about SPRING!


For this challenge I used the following Newton’s Nook Design’s product.

Hummingbird Stamp Set (flower only)

Petite Flowers Stencil

A7 Frame and Banners Die

Spring Roundabout Stamp Set (sentiment only)

When I think of think of Spring the first thing that comes to mind is flowers.

All the pretty colors that I will soon be looking at.

To start this card, I stared thumbing through my stamp set and seeing what sparked my interest.

I came upon the Hummingbird Stamp Set and the very funky flower that is in that set.

This gave me the idea to use this flower with bright bold color.
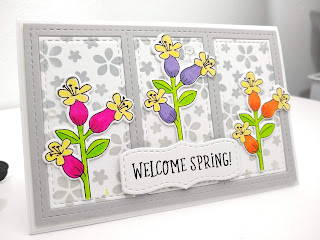


I stamped and colored the flower several times to give me lots of choices for this card.

But how to complement the flower was the next challenge.

I knew that I wanted to use the A7 Frame and Banners Die, but what colors?

I started pulling out cardstock to see what would match and settled on the unlikely choice of gray.

The gray just brought the colors of the flowers to life.

To make the card front, I die cut out all the pieces of the A7 die twice.

Once in gray and once in white card stock.

 I used the Petite Flowers Stencil with Hickory Smoke Distress Oxide

 and stenciled up each window insert that I had die cut in white.

To assemble the card, I created a card base with white card stock.


I glued down the frame of the A7 die and then glued in the window inserts I has created.

Next, I added on the flowers that I die cut out.

To finish out the card I create a place for my sentiment using one of the banners in the die set.

And that completes my take on this challenge.

Now it is your turn!

Show us your take on our fun color challenge

DON’T FORGET

Share your projects by using the link in

the challenge picture above.

You could be


OR


to receive a $20 Store Credit to Newton's Nook Designs!

using random.org

                                                       Do you use Instagram?                                           

#inkypawschallenge

#newtonsnook

#newtonsnookdesigns

Thanks so much for dropping by.


STAY SAFE AND STAY CRAFTY. 

DIANE


Wednesday, March 9, 2022

Bit O' Green - Simon Says Stamp Wednesday Challenge


THIS WEEK’S THEME AT THE

Simon Says Stamp Wednesday Challenge

BIT O’ GREEN

Featuring stamps and dies by

ALTENEW

You do not have to use the featured company to join in.

But… If you have some of their product in your stash

We would LOVE to see them used.

Here is my take on this challenge.


My Crafty Item of choice for this challenge is:

Here For You Clear Stamp Set

So excited to share all the fun elements on this card with you.

Started this card by creating a card base by using my favorite Neenah Desert Storm Card Stock.

To add some interest to the card base I stamped on the polka dots from the “Hello Sunshine” Stamp Set.

Next, I stamp out my chosen stamp. I stamped extra leaves since I wanted this to be the focus of my card.

 I just love the large size of this stamp so easy color that I decided

 to hand painted the flower using Distress Colors


 Once everything was dry, I stared the placement of my card by fussy cutting out all my flower parts.

Realizing that card front need something to break everything up on the front

up, I die cut out a banner from the Stitched Banner Dies by Simon Says Stamp.

This banner also became the placement for my sentiment.

Once the banner was glued down on my card front, I add on the flower

and all the leaves to the front of the card with foam tape.

To finish this card, I stamped on my sentiment and added on some gems to the front.

Loving to add a bit of surprise on my cards, I used Spectrum Noir Metallic Flip Markers.


This added some shimmer when the card hits the light.

This completes my take on BIT O’ GREEN

Featuring ALTENEW

I almost forgot the good news!


The lovely folks over at Simon Says Stamp are generously giving away

a FABULOUS $25 voucher to shop at the  Simon Says Stamp Store! 

All you must do is take out your crafty supplies, make something following this week’s prompt,

and add a link in the Inlinkz at the bottom of this post!

You can join 5 times so you could have 5 chances to win! How AWESOME is that!!

All winners are chosen randomly, so everyone has an equal chance to win!


GOOD LUCK TO EVERYONE!


Like the products I used.

I have direct links to everything below.

 Thanks so much for stopping by.

Sending HUGE Hugs

Stay Safe and Stay Crafty

Diane


HERE ARE THE ITEMS THAT I USED TO CREATE THIS CARD:


Here For You Clear Stamp Set by Altenew

Hello Sunshine Stamp Set by Simon Says Stamp

Stitched Banner Dies by Simon Says Stamp.

#120 White Card Stock by Simon Says Stamp

Neenah Desert Storm Card Stock.

Onyx Black Versa Fine Ink by Tsukineko

Clear Ink Pad by Simon Says Stamp

Mustard Seed Distress Ink by Ranger Ink

Carved Pumpkin Distress Ink by Ranger Ink

Twisted Citron Distress Ink by Ranger Ink

Metallic Flip Marker by Spectrum Noir

Love in a Mist Sequin Pack by Little Things from Lucy’s Cards

Foam Tape


Do you use Instagram?


If so, please add #ssswchallenge to your challenge entry uploads so we can see them on there too.


Monday, March 7, 2022

Inky Paw's Challenge 168 - Sketch Challenge


HAPPY MONDAY!

Who is ready for a NEW Inky Paws Challenge?

Check out this sketch challenge!

Here is my take on this sketch challenge.


For this challenge I used the following Newton’s Nook Design’s product.

Gnome Garden

A7 Frames and Banner Die

Circle Frames Die Set

The A7 size cards continue with this cute quick and easy Gnome card.

I have been trying to use stamp sets that I have not played with in a while.

Spring is right around the corner, and I thought the gnomes wound be perfect for this card.

When you are in a time crunch, grabbing printed cardstock from you stash is a must.

I chose this a masculine plaid for my background that is die

cut out with the A7 Frames and Banner Die.

Green cardstock became the stripe element.

Next, I die cut and colored my gnome dude.


I used the Circle Frames Die Set to create the front element where my gnome will sit.

I used a flower stamp from the Gnome Garden to create some interest behind the gnome.

To assemble this card, I first tied on green and white twine across the front of the card.

Once I go the twine looking good on the card, I attach the card to its base.

The gnome circle went on next, popped up with foam tape.

Finally, I created a sentiment banner and added that to the front.

The sentiment is embossed with white embossing powder.

That completes my take on this challenge.


Show us your take on our fun sketch challenge! 

DON’T FORGET

Share your projects by using the link in

the challenge picture above.

You could be


OR


to receive a $20 Store Credit to Newton's Nook Designs!

using random.org

Do you use Instagram?

Tag us using!

#inkypawschallenge

#newtonsnook

#newtonsnookdesigns

Thanks so much for dropping by.


STAY SAFE AND STAY CRAFTY.

DIANE


Inky Paw's Challenge 168 - Sketch Challenge


Hello Inky Paws Fans!

We are at the halfway point of this current challenge.

Check out this sketch challenge!

Here is my take on this sketch.

For this challenge I used the following Newton’s Nook Design’s product.

Cozy Campers

Sunscape Stencil

Land Boarders Die

Slimline Windows and Frames Die Set (banner)

The idea for this card came one evening when the sun was setting.

I thought about how lovely it would be to capture the layers of light on a card.

To create the look that I saw that evening,

I started by gluing down 1 ½ inch strips of colored card stock on to a white card stock base.

Make sure the colors that you used are noticeable different from each other.

This helps the colors in the background to pop back at you.


You will be embossing in the next step, so make sure the glue you use is completely dry.

I placed the Sunscape Stencil over the strips I created and generously applied Versamark ink.

Next, I coated the whole front in clear embossing powder and heat set.

This creates the beautiful ray of sunshine for the back of the card.

      Then, I stamped and colored the camper from the Cozy Campers stamp set.

To keep my camper grounded, I die cut out some grass using the Land Boarders Die.


Once the camper was glued to the front of the card, I created a place for

 my sentiment using the banner from the Slimline Windows and Frames Die Set.

To finish up this card, I created a card base and added on some hearts to the front of the card. 

That completes my take on this challenge.

Now it is your turn!

Show us your take on our fun color challenge

DON’T FORGET

Share your projects by using the link in

the challenge picture above.

You could be


OR


to receive a $20 Store Credit to Newton's Nook Designs!

using random.org

Do you use Instagram?

Tag us using!

#inkypawschallenge

#newtonsnook

#newtonsnookdesigns

Thanks so much for dropping by.


STAY SAFE AND STAY CRAFTY.

DIANE 


Wednesday, March 2, 2022

Add a Die Cut - Simon Says Stamp Wednesday Challenge

THIS WEEK’S THEME AT THE

Simon Says Stamp Wednesday Challenge

ADD A DIE CUT

Featuring stamps and dies by

MEMORY BOX

You do not have to use the featured company to join in.

But… If you have some of their product in your stash

We would LOVE to see them used.

Here is my take on this challenge.


My Crafty Item of choice for this challenge is:

Delicate Wreath by Memory Box

So excited to share all the fun elements on this card with you.

I stared this card by choosing three spring colors of card stock.

The card stock is cut into strips and glued down to light weight white card stock.


To add some interest, I used the long stripe from the Hello Sunshine Stamp Set

and Simon Clear Ink to stamp on a stripe to each strip.

Once the glue on the strips is dry, I die cut out my strips and this became my card front.

Next, the star of this card.

I die cut out the Delicate Wreath Die and 110 lb. card stock.

I chose not to remove all the little tidbit on this wreath.

I wanted a nice bulky wreath because for the next step I covered the wreath in sparkle pen.

 Unfortunately, you cannot see this in the photos because I shot on a cloudy day.

But this is some great up-close sparkle.


While the sparkle was drying on the wreath, I stamped on a sentiment

from the Garden Greeting Stamp Set on my stripes.

I also create the card base using the same die I used to create the card front.

After adhering all the elements to the card base, I add some bling with 

gems from Little Things by Lucy’s Cards.

This completes my take on ADD A DIE CUT

Featuring MEMORY BOX

I almost forgot the good news!


The lovely folks over at Simon Says Stamp are generously giving away

a FABULOUS $25 voucher to shop at the  Simon Says Stamp Store! 

All you must do is take out your crafty supplies, make something following this week’s prompt,

and add a link in the Inlinkz at the bottom of this post!

You can join 5 times so you could have 5 chances to win! How AWESOME is that!!

All winners are chosen randomly, so everyone has an equal chance to win!


GOOD LUCK TO EVERYONE!

 Like the products I used.

I have direct links to everything below.


Thanks so much for stopping by.

Sending HUGE Hugs

Stay Safe and Stay Crafty

Diane 


HERE ARE THE CRAFTY PRODUCTS I USED:

Delicate Wreath Die by Memory Box

Hello Sunshine by Simon Says Stamp

Garden Greeting Stamp Set by Simon Says Stamp

Circle Frames Die by Newton’s Nook Designs

Cornflower Card Stock by Simon Says Stamp

Lavender Purple Card Stock by Simon Says Stamp

Surf Blue Card Stock by Simon Says Stamp

Neenah White Card Stock 80lbs

Onyx Black Versa Fine Ink by Tsukineko

Clear Ink Pad by Simon Says Stamp

Clear Sparkle Pen by Spectrum Noir

Tiara Sequin Pack by Little Things from Lucy’s Cards


Do you use Instagram?


If so, please add #ssswchallenge to your challenge entry uploads so we can see them on there too.