Monday, August 29, 2022

Inky Paw's Challenge 181 - Fall Theme


HAPPY MONDAY!

Who is ready for a NEW Inky Paws Challenge?

Check out this challenge!

For this challenge I used the following Newton’s Nook Design’s product.

Harvest Haul Stamp Set

Autumn 6x6 Paper Pad

Using the Fall Theme, I created this card.


I am so excited for all the fun Fall themed stamps.

To start this card created a card base with Kraft cardstock.

 I trimmed down a piece of the Autumn cardstock to fit on the front.

Next, I die cut a rectangle of white cardstock.

To ground the stamped image that I am placing on the front,

I placed a 1 ¼ strip of craft cardstock at the bottom.


Next, I stamped and colored the truck from the Harvest Haul Stamp Set.

I added the truck to the front of the card with foam tape.

Next, I lined up my sentiment above the truck and stamped that on my card.

To finish my card, I added on some falling leaves.

This includes my take on this challenge.

Hope this gives you a bit of inspiration for your next project.

Make sure you share your projects by using the link in

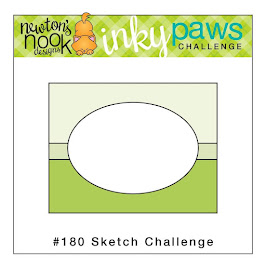
the challenge picture above.

You could be


OR


to receive a $20 Store Credit to Newton's Nook Designs!

using random.org

Do you use Instagram?

#inkypawschallenge

#newtonsnook

#newtonsnookdesigns

Thanks so much for quickly visiting.


STAY SAFE AND STAY CRAFTY.

DIANE


Wednesday, August 24, 2022

Anything Goes - Simon Says Stamp Wednesday Challenge


THIS WEEK’S THEME AT THE

Simon Says Stamp Wednesday Challenge

ANYTHING GOES

Featuring products by

CZ DESIGNS

You do not have to use the featured company to join in.

But… If you have some of their product in your stash

We would LOVE to see them used.

Here is my take on this challenge.


For this card I used the following product

Clean Line Stacks Stamp Set

Love You Die

I also used other assorted items listed below.

Christmas time is all about the gift cards for me!

This is a quick and easy card that you could mass produce.

I stared with a card base of black cardstock.

Over that I cut a rectangle of white cardstock to be my card front.

Using a stamp from the Clean Line Stacks Stamp Set I stamped my words across the front.

Next, I die cut my pieces from the I love you die.


The back piece of the die I sprayed with Fortune Teller Mica Stain and placed it aside to dry.

I end up die cutting the “I love you” die twice to make the words nice and stiff for the card front.

I glued all my pieces together and added the words to the front of the card.

I finished this card with some clear sequins.

This completes my take on ANYTHING GOES

Featuring CZ DESIGNS

I almost forgot the good news!


The lovely folks over at Simon Says Stamp are generously giving away

a FABULOUS $25 voucher to shop at the  Simon Says Stamp Store! 

All you must do is take out your crafty supplies,

 make something following this week’s prompt,

and add a link in the Inlinkz at the bottom of this post!

You can join five times so you could have five chances to win! How IMPRESSIVE is that!!

All winners are chosen randomly, so everyone has an equal chance to win!


GOOD LUCK TO EVERYONE!


Like the products I used.

I have direct links to everything below.


Thanks so much for stopping by.

Sending HUGE Hugs

Stay Safe and Stay Crafty

Diane


HERE ARE THE SUPPLIES TO CREATE THIS CARD


Clean Line Stacks Stamp Set by CZ Designs

Love You Die by CZ Designs

#120 White Card Stock by Simon Says Stamp

Black/Black 8 Card Stock by Simon Says Stamp

Onyx Black Versa Fine Ink by Tsukineko

Tim Holtz Distress Halloween Fortune Teller Mica Stain by Ranger Ink

Sequins and Gems Pack by Little Things from Lucy’s Cards


Do you use Instagram?


If so, please add #ssswchallenge to your challenge entry uploads so we can see them on there too.


Monday, August 22, 2022

Inky Paw's Challenge 180 - Sketch Challenge


Hello Inky Paws Fans!

We are at the halfway point of this current challenge.


For this challenge I used the following Newton’s Nook Design’s product.

Newton’s Perfect Wave

Shark Bites (fish)

Summertime 6x6 Paper Pad

Using the sketch challenge, I created this card


Summer is almost over, so I thought this would be the perfect chance for one last summer card.

I started with a basic white cardstock tag.

I added strips of blue cardstock along the bottom of the tag.

I wanted to simulate ocean in a different way.

I stamped the fish from the Shark Bites stamp set on top of the strips, to add some texture.

With my “ocean” finished, I stamped and colored my image from my chosen stamp set, Newton’s Perfect Wave.


I angled Newton on top the stripped ocean that I created to look like he is surfing a wave.

I also stamped on a sentiment to the tag.

Next, I created a card base 3 ½ x 6.

On top of the card base I added paper from the Summertime 6x6 Paper Pad.

To complete this card, I added a bit of sparkle here and there.

This includes my take on this challenge.

Hope this gives you a bit of inspiration for your next project.

Make sure you share your projects by using the link in

the challenge picture above.

You could be


 OR


to receive a $20 Store Credit to Newton's Nook Designs!

using random.org

Do you use Instagram?

#inkypawschallenge

#newtonsnook

#newtonsnookdesigns

Thanks so much for quickly visiting.


STAY SAFE AND STAY CRAFTY.

DIANE


Tuesday, August 16, 2022

Christmas - Simon Says Stamp Wednesday Challenge


THIS WEEK’S THEME AT THE

Simon Says Stamp Wednesday Challenge

CHRISTMAS

Featuring products by

SPELLBINDERS

You do not have to use the featured company to join in.

But… If you have some of their product in your stash

We would LOVE to see them used.

Here is my take on this challenge.


For this card I used the following product

SPELLBINDERS STICHED ETCHED ORNIMENTS

I also used other assorted items listed below.

Christmas time is all about the gift cards for me!

I love to create flashy envelopes to give my gift cards with.

To start the ornaments for the gift envelope I used Tarnish Brass and

Brushed Pewter Distress Paint and painted Yes… painted right onto heavyweight cardstock.


Once the paint is completely dry, I ran my ornament thru the die cut machine.

I also die cut all the extra that give the ornament dimension.

With all my pieces cut, I started the assembly process.

 All the extra pieces of the ornaments I stacked up three layers so that they could stand out.

Now for the fun part, I grabbed my basket of gems and started to figure out what gems I wanted to use.

Happy with the placement I glued down the gems.

I also added a bit of Stickles to bump up the bling factor.


 While the ornaments are drying, I started on the envelopes.

This was made easy by using the Collector Tim Holtz Die Set.

In retrospect I should have used more bold colors on the envelops, next time.

I also stamped some details on the envelope using stamps from the Gnome for the Holiday Stamp Set.


All the components are finished, time to assemble the envelopes.

I punched a hole in the top of the ornament and attached the ornaments to the envelope with basic twine.

I also glued on the extra branches that I die cut branched to the front of the ornament.

 I snipped out a couple of Reverse Holiday sentiment to add to ornament and I was done!

Ready for gift cards!

This completes my take on CHRISTMAS

Featuring SPELLBINDERS

I almost forgot the good news!


The lovely folks over at Simon Says Stamp are generously giving away

a FABULOUS $25 voucher to shop at the  Simon Says Stamp Store! 

All you must do is take out your crafty supplies,

 make something following this week’s prompt,

and add a link in the Inlinkz at the bottom of this post!

You can join five times so you could have five chances to win! How IMPRESSIVE is that!!

All winners are chosen randomly, so everyone has an equal chance to win!

GOOD LUCK TO EVERYONE! 

Like the products I used.

I have direct links to everything below.


Thanks so much for stopping by.

Sending HUGE Hugs

Stay Safe and Stay Crafty

Diane


HERE ARE THE SUPPLIES TO CREATE THIS CARD

Stitched Ornaments Etched Dies by Spellbinders

Gnome for the Holiday Stamp Set By Simon SaysStamp

Collector Thinlits Tim Holtz Die Set By Sizzix

#120 White Card Stock by Simon Says Stamp

Midnight Green Card Stock by Simon Says Stamp

Soft Navy Card Stock by Simon Says Stamp

Reverse Holiday Sentiments by Simon Says Stamp

Disco Ball Sickles by Ranger Ink

Golden Rod Sickles by Ranger Ink

Tarnish Brass Distress Paint by Ranger Ink

Brushed Pewter Distress Paint by Ranger Ink

Glow in the Dark Twine by Lawn Fawn

Sequins and Gems Pack by Little Things from Lucy’s Cards


Do you use Instagram? 


If so, please add #ssswchallenge to your challenge entry uploads so we can see them on there too.


Monday, August 15, 2022

Inky Paw's Challenge 180 - Sketch Challenge


Hello Inky Paws Fans!

We have a NEW challenge coming your way.


Aloha Newton

Oval Frames Die Set

Sky Boarders Die Set

Clouds Stencil

Summertime 6x6 Paper Pad

Using the sketch challenge, I created this card

To start this card, I stamped out my image from the Aloha Newton Stamp Set.

I kept the colors tropical when coloring the image.

I used the scalloped oval from the Oval Frames Die to create the oval element on the sketch.

Using the Clouds Stencil and Distress Ink I created a fluffy blue sky on the oval.

I also die cut a second Oval out of kraft cardstock.

Using the Sky Boarders Die I die cut off part of the bottom to become my sandy beach.


To make this more beach like, I added Distress Ink speckles and darken the edges.

I created a card base, out of basic white card stock.

I chose three different cardstocks from the summertime 6x6 paper and glued them to my card base.

Next, I assembled all my elements for the oval.

I added my image from the Aloha Newton Stamp Set to the oval with foam tape.

To finish the card, I created a simple sentiment banner and added that to the front of the card.


Share your projects by using the link in

the challenge picture above.

You could be


OR


to receive a $20 Store Credit to Newton's Nook Designs!

using random.org

                                              Do you use Instagram?                                                

#inkypawschallenge

#newtonsnook

#newtonsnookdesigns

Thanks so much for quickly visiting.


STAY SAFE AND STAY CRAFTY.

DIANE