Showing posts with label Tumbling Hearts Stencil. Show all posts

Tuesday, March 31, 2026

Spring Time Easter Card


Hello Cardmaking Fans!

I am happy to be here to share this fun Easter Card!


For the Card Base

To start, I created a card base and front using the

Basic Frames Die Set. I chose pink card stock to keep with the Spring theme.

To keep the background from looking boring, I used the Tumbling Hearts Stencil

along with Worn Lipstick Distress Oxide Ink.


Designing the Card Front

Next, I turned my attention to the front of the card.

 For this card, I used Newton’s Easter Basket. I kept the color combo really

bright and festive to make the image pop.

After I completed the coloring, I cut out the image with coordinating dies.

To complete the front, I used the banner die from the Basic Frames Die Set.

I flipped the banner upside down and added it to the front of the card.


I added the image from Newton’s Easter Basket to the bottom of the banner.

Finally, I stamped on my sentiment. For a finishing touch, I added on extra baby chicks and hearts.

Hope you enjoyed my take on Spring cardmaking.

Stay Crafty Everyone!

Thanks so much for stopping by. 

DIANE

Monday, January 24, 2022

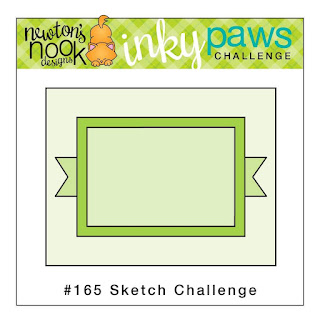
Inky Paw's Challenge 165 - Sketch Challenge


Hello Inky Paws Fans!

We are at the halfway point of this current challenge.


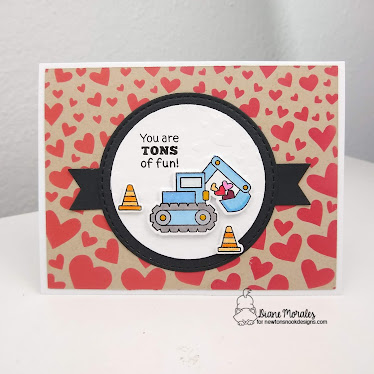
Here is my take on the challenge!

For this challenge I used the following Newton’s Nook Design’s product.

Love Quarry Stamp Set

Circle Frames Die

Tumbling Hearts Stencil

Frames and Flags Die Set

Kraft cardstock is one of my favorites to use on cards.

Now that there is Distress Oxide Ink, it is so easy to add color on top of that cardstock.

Barn Door Distress Oxide is my color of choice.

The Tumbling Hearts Stencil is going to make this card so cute!


I inked up my background and placed it aside to dry and turned my attention to the rest of the card.

I die cut my center from the Circle Frames Dies.

For the white circle, I used the Tumbling Hearts Stencil and my embossing pad

 for the die cut machine to emboss the hearts on the paper.


Next, I stamped and colored images from the Love Quarry Stamp Set.

With all my components ready to go, I stared to assemble the card.

First, I burnished off a bit of the embossed circle to add my sentiment.

This circle is layered onto the black circle and a banner created from the Frames and Flags Die Set.

To finish my card, I cut down my background of hearts and glued it to a card base.

I added my center circle and safety cones, and my card is done.

That completes my take on this challenge.


Now it is your turn!

Show us your take on this sketch.


DON’T FORGET

Share your projects by using the link in

the challenge picture above.

You could be


OR


to receive a $20 Store Credit to Newton's Nook Designs!

using random.org

Do you use Instagram?

Tag us using!

#inkypawschallenge

#newtonsnook

#newtonsnookdesigns

Thanks so much for dropping by.


STAY SAFE AND STAY CRAFTY.

DIANE


Monday, January 25, 2021

Inky Paw's Challenge - Color Challenge


                  Hello Inky Paws Fans!

We are at the halfway point of this current challenge.

Here is a refresher.


 MY take on the challenge is a simple one that uses up some of

the scrap paper we all have in abundance in our craft spaces.

I recently moved around a few things in my crafty space.

I use the ELFA system in my office and got a few extra slide-out baskets 

to put my scrap paper and bits closer to my desk.

Best idea ever! Do not know why I did not do this sooner.

I went right to my scrap paper drawer, pulled out the challenge colors

 and got to work creating a background for this card.

I cut a 1 ½ x 5 ½ strip of paper out of each one of the colors.

I took those strips and glued them to a piece of plain white cardstock.

I taped the Tumbling Hearts Stencil over the top of the strips of paper 

and a applied a good amount of clear Versamark ink over the top.


I heat set the Versamark with clear embossing powder,

and sat back to admire all the cute hearts.

The Large Scalloped rectangle from the Frames and Flags Die Set is

what I die cut my stripped background from.

My featured stamp is Roses by Newtons Nook Designs.

I made the bold choice of keeping the rose white

with just a bit of gray highlights and green leaves.

I used a sentiment that is part of the Roses Stamp Set.


I stamped the sentiment onto a banner that was created with the Banner Trio Dies.

For a final touch, I added some shimmer to the rose with a Spectrum Noir shimmer pen. 

Now it is your turn!

Show us your take on these fun challenge colors.

 DON’T FORGET

Share your projects by using the link in the challenge picture above.

You could be chosen as


OR


to receive a $20 Store Credit to Newton's Nook Designs!

using random.org

Do you use Instagram?

Tag us using!

#inkypawschallenge

#newtonsnook

#newtonsnookdesigns

Thanks so much for dropping by.

STAY SAFE AND STAY CRAFTY.

 DIANE


Monday, January 13, 2020

Inky Paws Challenge #114


We are at the midway point of the current Inky Paws Challenge.
Here is the challenge sketch.
 Inky Paws Challenge

Here is my take on the sketch.

 A card by Diane Morales featuring the Newton Dreams of Italy Stamp Set by Newtons Nook Designs for the Inky Paws Challenge

When I create my projects, I like to thumb through
 my Newton Nook Stamps to see what sparks my creativity.
I came upon the Newton Dreams of Italy Stamp Set and an
 idea immediately jumped into my head.
Using the Curved edge rectangle of the Frame and Flags Die Set
I created the center of the design.


I thought it would be fun to have the bottom part look like water 
and use Newton in a gondola as the features stamp.
I was just going to use printed paper as the background, but after staging 
the card together I discovered that the printed paper was not enough.
Why not add some more texture using the 
Tumbling Hearts Stencil and Distress Oxide Ink.


The rest of my card I kept simple by using the largest heart from 
the Darling Hearts Die Set behind my image.
I also used the “love” part of the die set and 
a WHOLE LOT of foam tape To finish my card.


Just a clean and simple card.
Now it is your turn.
What will you create using the challenge sketch?
Link up in the challenge picture above.
Show us on social media using the following hashtags.
#inkypawschallenge
#newtonsnook
#newtonsnookdesigns
Thanks for stopping by
Have a great week.
Hugs
Diane

Monday, November 11, 2019

Hogs and Kisses IPC 110


We are at the halfway point of the current
INKY PAWS CHALLENGE!
Here are the challenge colors.

As you can see,
no holiday card by me!

Hogs and Kisses a card by Diane Morales | Oink Stamp Set by Newton's Nook Designs

I just wanted to have fun with the colors.
 because pigs are pink, I chose the
everything else fell into place.
 to create the white hearts on my teal background.


The green is my grassy hills using the
I attached all of this on the
Large Scalloped Rectangle from the


I hope this inspires you to break out your favorite
Newtons Nook Stamp Set
and craft up something fun.
Thanks for stopping by
Wishing you all “hogs and kisses”

Have an amazing week.
Diane


Sunday, July 14, 2019

Mermaid for Each Other IPC 102


Happy Monday!
Welcome to a new INKY PAW’S CHALLENGE!
Check out this fun sketch we have for you to use.


Summer is here, so I decided to go in a beachy direction.


Mermaid for Each Other a card by Diane Morales | Purr-Made Stamp Set by Newton's Nook Designs

This card all starts with the background.
I used 3 types of Distress Oxide Ink and spattered them on a paint pallet.
Spray on a little water, and smash down your precut cardstock onto the ink.


Make sure you dry your inky creation with a heat gun right away
to keep the colors from over blending.
While that was drying, I turned my attention to my purr-maids form the
I stamped and colored my images in using matching colors from the background.


I kept the background elements simple; die cutting out 2 rectangle panels.
One of the panels, I embossed with the
The second panel I inked in with Abandoned Coral Oxide Ink
Then layer the two elements on top of each other.
A splash of a different color and the bottom element.
was provided by the seahorse and sentiment from the same stamp set.


After I assembled all the elements for the card, I used one of
my favorite crafty items….. EVER!!! Frosted Lace Stickles


This Stickle adds a whole lot of sparkle without
taking away from the color underneath.
That is my inspiration for this sketch.
Here is the crafty aftermath of this card!


Now it is your turn!
Don’t forget to link up your creations
Using the link in the challenge picture above.

Thanks for dropping by!

Diane


Sunday, February 24, 2019

What's MOO! IPC 92


Welcome to a NEW Inky Paws Challenge.
This one will stretch those crafty muscles.

I been going thru a creative rut right now.
When this happens, I usually thumb thru my stamp sets for inspiration.


What's MOO ! a tag by Diane Morales | Farmyard Friends Stamp Set by Newton's Nook Designs

I came upon the Farmyard Friends StampSet and this set inspired this project.
I chose to create a tag using some fun orange printed paper from my stash.
 The background element using the Tumbling Heart Stencil.
This is embossed on Kraft card stock.


The forward element features the cow from the
Farmyard Friends Stamp Set and my sentiment.
For a pop of color, and the final element, I added grass using the


 Simple yarn bow finishes this tag.
Now it is your turn!
What will you create using this sketch?

Thanks for stopping by

 Huge Hugs

DIANE