Sunday, December 16, 2018

Fleece Navidad to you! IPC 87


We are at the halfway point of the current Inky Paws Challenge.
Check out our current challenge!

I absolutely love the Fleece Navidad Stamp Set
A perfect stamp set to use for this challenge!

Fleece Navidad to you! a card by Diane Morales| Fleece Navidad Stamp Set by Newtons Nook Designs

The background for this card starts with the 
Starfield Stencil and some Ranger Glossy Texture Paste.
Apply the texture paste over the stencil onto white cardstock.
When the Texture Paste is dry, apply Brushed Pewter Distress Stain over the top of it.
Using a clean cotton cloth (aka cut up t-shirt) slowly rub over the top to expose the stars.


This next part of the card had to reverse-engineered.
I needed to decide where the sentiment was going to go before 
adding my trees and sheep to the front of the card.
 I die cut out a “hill” from the Land Border Die Set and white cardstock.
Placing the “hill” on the front of the card I decided where the
 sentiment should go and stamped it on the "hill".
Next, I stamped and colored my sheep from the Fleece Navidad Stamp.
I chose red for the accents on the sheep.
I really wanted a pop of color against all the white and silver on the card.


Using the Festive Scene Builders Die Set
I die cut out some trees from silver cardstock.
Finally, I assembled all the components on the front of the card.
I hope this inspires you to create something sparkly and shinny

Thanks for stopping by,
I hope everyone has an amazing holiday!

Hugs

Diane


Monday, December 10, 2018

A Festive Forest IPC 87


Welcome to a NEW Inky Paws Challenge.
We have some super fun colors for you to play with for the next two weeks.

When I saw the challenge colors, I knew immediately which Stamp Set I wanted to use.

Festive Forest!

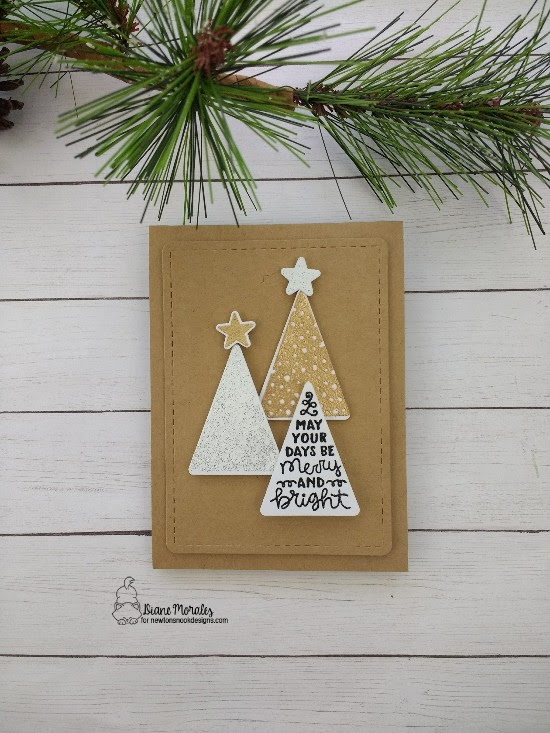
A Festive Forest a card by Diane Morales | Festive Forest Stamp Set by Newtons Nook Designs

Since, I already knew what colors I was going to be using,
I started this card out by picking the style of trees that I wanted.
Once my 2 trees were decided, I realized that I really wanted those trees to stand out.
I thought about embossing powder and chose two of the most metallic colors that I had.


One my trees were embossed, and die cut out, I turned my attention to the base of the card.
Using craft cardstock and the center of the Frames and Flag Die Set,
I created the center and base of the card.
I placed my challenge color trees on the top of the card using foam tape.
Finally, I stamped out and added my sentiment tree and gold and silver stars.

Festive Forest is a must for your crafty arsenal.
I love this Stamp Set. Every holiday season I pull it out and get so much inspiration.
Since it is trees, I've often used it during other parts of the year as well.
I hope this inspires you to create something sparkly and share
It with us using the link in the challenge picture above.

Thanks for stopping by!
Have an amazing Holiday Season!

Hugs

Diane


Monday, December 3, 2018

Merry and Bright IPC 86


Welcome to the second half of the current Inky Paws Challenge.
Here's the challenge sketch for you to check out.


This sketch is so much fun, but I might have gone overboard with this one.

Merry and Bright a card by Diane Morales | Petite Snow Stencil by Newtons Nook Designs

This card starts with the background.
Using the Petite Snow Stencil and some texture paste on white cardstock.
When that was dry, I taped off some lines with blue tape and 
applied Black Soot Distress Ink over the top of it


The first set off “stripes” I dried with a heat gun and then
 taped off the center to create the smaller stripes.
Holding my breath for this part, I inked in the center part of my stripes.
With the background done and drying, I turned my attention to tag on the front of the card.
The background “hills” is vanilla card stock and the Sky Boarders Die Set.
Die cut out two “hills” and layered the “hills” on top of each other over some white cardstock.
I used the tag from the Fancy Edges Tag Die Set, die cut everything out together.
Attach those “hills” directly onto the tag, leaving a little space in between for my trees.
The trees come next, using the Forest Scene Builder Die Set.
Using three of my favorite bright colors stamped out the trees, 
die cut them out and attach them to the front of the tag.


Time to add the snowman. He comes from the Snow Globe Scenes Stamp Set
Keeping with bright color theme, I chose red for the scarf.
Finally, I stamped the sentiment from the 
Sentiments of the Season Stamp Set on the front of the tag.

The only thing left to do is attached the tag to the front of card.
For some flair, I added Nuevo Drops to the trees and the background behind the snowman.

YEP!  There is a lot going on this card but…
It’s just SO MUCH FUN to mix and match dies and stamps up.
I hope this inspires you to MIX IT UP.
Don’t forget to link up your project using the link in the challenge picture.

Thanks for stopping by.
Have a wonderful holiday.
Diane


Petite Snow Stencil by Newtons Nook Designs


Sky Boarders Die Set by Newton's Nook Designs


Fancy Edges Tag Set by Newton's Nook Designs

Forest Scene Builder Die Set by Newton's Nook Designs

Snow Globe Scenes Stamp Set by Newtons Nook Designs

Snow Globe Scenes Die Set by Newtons Nook Designs

Sentiment of the Season Stamp Set by Newton's Nook Designs


Monday, November 26, 2018

Warm Winter Wishes IPC 86


 Welcome to a NEW Inky Paws Challenge

Check out this sketch we have for you.


Super excited to see how everyone interprets this sketch!
I looked at the sketch for a long time before I came up with card.

Warm Winter Wishes a card by Diane Morales | Winter Memories Stamp Set by Newtons Nook Designs


Living in Texas you have ACTUAL winter weather, and my card 
reflects the cool winter colors that I have been into lately.
The Evergreen Stencil started this whole project.
I was going to stencil the background the trees in a different color but…
I was not paying attention to what I was doing and stenciled the trees the wrong color.
Since I do not like to scrap a project and starting over, I decided to go with the gray trees.
I kept adding more color to the top of trees, until I got the color blend I was looking for.
With the trees done I grabbed the Winter Memories Stamp Set.
I Stamp out my pond in the Stormy Sky Distress Ink
(that was supposed to be the tree color)
And, because I like a pop of color, I stamped, and die cut the skaters in red.


The background I kept simple,
This is a dark silver cardstock that has I cut 1-inch strips of
the grey Birch printed paper and layered on top.
I stamped on my sentiment and attached everything together.

 I hope this inspires you to roll with your mistakes and see where they take you.
Use the challenge picture above to link up your projects.
the pictures below to check out the products I used.

Thanks for stopping by.

Hugs

Diane


Sunday, November 18, 2018

Three Tags and Santa Paws IPC 85


Welcome to the second half of the current Inky Paws Challenge.
We have some great colors for you to work with.


My inspiration for this challenge is not one, not two, BUT three tags!

Three Tags and Santa Paws a set of Tags by Diane Morales | Santa Paws Newton Stamp Set by Newton's Nook Designs

The first box features the round tag from the Tags Times Two Die Set 
and just a portion of one of the stamped images
from the Santa Paws Newton Stamp Set.
 that I colored in.


A super easy one to do if you need a quick gift.
The second tag features the square tag from the Tags Times Two Die Set. 
The background of this tag starts with the Serene Stripes Stencil 
and texture paste that creates a nice backround for the tag.


The mouse, sentiments, and “presents” come from the Santa Paws Newton Stamp Set.
These images are simply colored in, die cut out and attached to the tag.
For a little bit of Flair, I outlined the bow on the top of the presents with gold pen.
The third box is my favorite.


I created a plain white box using a box punch.
Once I was done, I stamped the Newton Santa and mouse image from 
the Santa Paws Newton Stamp Set.
I colored that in using Distress Ink and accented this with glossy accent.
The tag on top was created by using trees from the Festive Forest Stamp Set 
and the North Pole image from the Santa Paws Newton Stamp Set.
I stamped, and die cut out two trees and glued those together.


To the top of this, I added the North Pole image that was colored in and die cut out.

I hope my tags inspire you to create some tags of your own and
share them with us at the Inky Paws Challenge.
I hope everybody has a wonderful Thanksgiving.

Thanks for stopping by
Links to the goodies below

Hugs

Diane


Monday, November 12, 2018

Merry Christmas Tag IPC 85


Welcome to a NEW Inky Paws Challenge.
Check out these fun colors we have for you to work with.

Using the Forest Scene Builder Die Set 
and the challenge colors I came up with this tag.

Merry Christmas Tag  a Tag by Diane Morales | Forest Scene Builder Die Set by Newtons Nook Designs


Color challenges are the best! So many ways to use the colors.
I decided to start with a black and white color first.
I grabbed an oval die and some black and white paper from my stash.
The idea was to create a forest scene in the center of this pattern paper.
Once I cut out the oval Center, I got some heavy white cardstock and
my Land Boarder Die Set to create some hills.
I also use the Petite Snow Stencil to create a background.


A note on this, I did not run my stencil through Cuttlebug correctly.
Unfortunately, you cannot really see the pattern once it was photographed.
I decided that my group trees just need to be green, so I selected three
colors of green cardstock and I cut out my trees.
I assembled all of this on my tag and got ready to add my sentiment.
The red portion of my tag is pattern paper cut from the banner
portion of the Frames and Flags Die Set.


I use the sentiment from the Sentiments of the Season Stamp Set.
I also die cut out one of those cute birds from my pattern paper
 and added that to my trees.

I love the Forest Scene Builder Die Set.
The trees are the perfect size for cards and tags.

I hope this inspires you to take some time and create something.
Don’t forget to share with us at the Inky Paws Challenge.

Thanks for stopping by.

Hugs

Diane